Animated Buttons For Blogger : Let's Do Something interesting , today we are going to share some beautiful style buttons which can be easily made by using CSS.Actually these buttons makes your "download links" attractive and stylish.For adding these buttons you have to add a Script in template HTML , so first backup your Blog Template and then implement this hack !

So What's Up : Adding these Bubble Buttons makes your post more attractive and Cool.So if You Can why not implement it?Stay Blessed , Happy Blogging!

How To Add Animated Buttons in Blogger
- Go To Blogger
- Click On Template
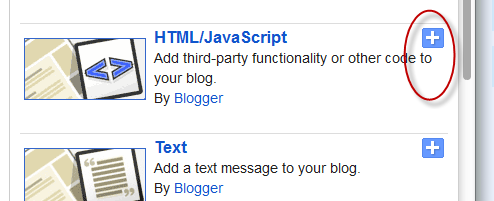
- Edit HTML
- Search For ]]></b:skin>
- Copy the Below CSS Script and paste it above ]]></b:skin>
.button {display: inline-block;position: relative;padding: 10px 20px;-webkit-border-radius: 8px;-moz-border-radius: 8px;border-radius: 8px;text-decoration: none!important;text-shadow: 1px 1px 0 rgba(255,255,255,0.4);font: 15px Calibri,Arial,sans-serif;white-space: nowrap;vertical-align: baseline;background-image: url('https://blogger.googleusercontent.com/img/b/R29vZ2xl/AVvXsEiG5YW6fSSZknCR7W6D6vZBNkoULKIYAW2sUbEYjUNCPOsGsKolewVLy6m2niap0QIQN0Z03zE4qLgaICqOw-7jX1llm48lY6yUBW8bnaqmkPtbvrhUczJ-9GBEH4J_x8sY0n4z6moixI5a/s144/button_bg.png');background-position: bottom left;background-position: bottom left,top right,0 0,0 0;background-repeat: no-repeat;background-clip: border-box;-webkit-box-shadow: 0 0 1px #fff inset;-moz-box-shadow: 0 0 1px #fff inset;box-shadow: 0 0 1px #fff inset;-webkit-transition: background-position 1s;-moz-transition: background-position 1s;transition: background-position 1s;cursor: pointer;}
.button:hover {background-position: top left;background-position: top left,bottom right,0 0,0 0;}
.button:active {bottom: -1px;}
.button.big {font-size: 30px;}
.button.medium {font-size: 18px;}
.button.small {font-size: 13px;}
.blue.button {border: 1px solid #84acc3!important;color: #0f4b6d!important;background-color: #48b5f2;background-image: url('https://blogger.googleusercontent.com/img/b/R29vZ2xl/AVvXsEiG5YW6fSSZknCR7W6D6vZBNkoULKIYAW2sUbEYjUNCPOsGsKolewVLy6m2niap0QIQN0Z03zE4qLgaICqOw-7jX1llm48lY6yUBW8bnaqmkPtbvrhUczJ-9GBEH4J_x8sY0n4z6moixI5a/s144/button_bg.png'), url('https://blogger.googleusercontent.com/img/b/R29vZ2xl/AVvXsEiG5YW6fSSZknCR7W6D6vZBNkoULKIYAW2sUbEYjUNCPOsGsKolewVLy6m2niap0QIQN0Z03zE4qLgaICqOw-7jX1llm48lY6yUBW8bnaqmkPtbvrhUczJ-9GBEH4J_x8sY0n4z6moixI5a/s144/button_bg.png') ,-moz-radial-gradient(center bottom,circle,rgba(89,208,244,1) 0,rgba(89,208,244,0) 100px),-moz-linear-gradient(#4fbbf7,#3faeeb);background-image: url('https://blogger.googleusercontent.com/img/b/R29vZ2xl/AVvXsEiG5YW6fSSZknCR7W6D6vZBNkoULKIYAW2sUbEYjUNCPOsGsKolewVLy6m2niap0QIQN0Z03zE4qLgaICqOw-7jX1llm48lY6yUBW8bnaqmkPtbvrhUczJ-9GBEH4J_x8sY0n4z6moixI5a/s144/button_bg.png'), url('https://blogger.googleusercontent.com/img/b/R29vZ2xl/AVvXsEiG5YW6fSSZknCR7W6D6vZBNkoULKIYAW2sUbEYjUNCPOsGsKolewVLy6m2niap0QIQN0Z03zE4qLgaICqOw-7jX1llm48lY6yUBW8bnaqmkPtbvrhUczJ-9GBEH4J_x8sY0n4z6moixI5a/s144/button_bg.png') ,-webkit-gradient(radial,50% 100%,0,50% 100%,100,from(rgba(89,208,244,1) ),to(rgba(89,208,244,0) )),-webkit-gradient(linear,0% 0,0% 100%,from(#4fbbf7),to(#3faeeb));}
.blue.button:hover {background-color: #63c7fe;background-image: url('https://blogger.googleusercontent.com/img/b/R29vZ2xl/AVvXsEiG5YW6fSSZknCR7W6D6vZBNkoULKIYAW2sUbEYjUNCPOsGsKolewVLy6m2niap0QIQN0Z03zE4qLgaICqOw-7jX1llm48lY6yUBW8bnaqmkPtbvrhUczJ-9GBEH4J_x8sY0n4z6moixI5a/s144/button_bg.png'), url('https://blogger.googleusercontent.com/img/b/R29vZ2xl/AVvXsEiG5YW6fSSZknCR7W6D6vZBNkoULKIYAW2sUbEYjUNCPOsGsKolewVLy6m2niap0QIQN0Z03zE4qLgaICqOw-7jX1llm48lY6yUBW8bnaqmkPtbvrhUczJ-9GBEH4J_x8sY0n4z6moixI5a/s144/button_bg.png') ,-moz-radial-gradient(center bottom,circle,rgba(109,217,250,1) 0,rgba(109,217,250,0) 100px),-moz-linear-gradient(#63c7fe,#58bef7);background-image: url('https://blogger.googleusercontent.com/img/b/R29vZ2xl/AVvXsEiG5YW6fSSZknCR7W6D6vZBNkoULKIYAW2sUbEYjUNCPOsGsKolewVLy6m2niap0QIQN0Z03zE4qLgaICqOw-7jX1llm48lY6yUBW8bnaqmkPtbvrhUczJ-9GBEH4J_x8sY0n4z6moixI5a/s144/button_bg.png'), url('https://blogger.googleusercontent.com/img/b/R29vZ2xl/AVvXsEiG5YW6fSSZknCR7W6D6vZBNkoULKIYAW2sUbEYjUNCPOsGsKolewVLy6m2niap0QIQN0Z03zE4qLgaICqOw-7jX1llm48lY6yUBW8bnaqmkPtbvrhUczJ-9GBEH4J_x8sY0n4z6moixI5a/s144/button_bg.png') ,-webkit-gradient(radial,50% 100%,0,50% 100%,100,from(rgba(109,217,250,1) ),to(rgba(109,217,250,0) )),-webkit-gradient(linear,0% 0,0% 100%,from(#63c7fe),to(#58bef7));}
.green.button {border: 1px solid #96a37b!important;color: #345903!important;background-color: #79be1e;background-image: url('https://blogger.googleusercontent.com/img/b/R29vZ2xl/AVvXsEiG5YW6fSSZknCR7W6D6vZBNkoULKIYAW2sUbEYjUNCPOsGsKolewVLy6m2niap0QIQN0Z03zE4qLgaICqOw-7jX1llm48lY6yUBW8bnaqmkPtbvrhUczJ-9GBEH4J_x8sY0n4z6moixI5a/s144/button_bg.png'), url('https://blogger.googleusercontent.com/img/b/R29vZ2xl/AVvXsEiG5YW6fSSZknCR7W6D6vZBNkoULKIYAW2sUbEYjUNCPOsGsKolewVLy6m2niap0QIQN0Z03zE4qLgaICqOw-7jX1llm48lY6yUBW8bnaqmkPtbvrhUczJ-9GBEH4J_x8sY0n4z6moixI5a/s144/button_bg.png') ,-moz-radial-gradient(center bottom,circle,rgba(162,211,30,1) 0,rgba(162,211,30,0) 100px),-moz-linear-gradient(#82cc27,#74b317);background-image: url('https://blogger.googleusercontent.com/img/b/R29vZ2xl/AVvXsEiG5YW6fSSZknCR7W6D6vZBNkoULKIYAW2sUbEYjUNCPOsGsKolewVLy6m2niap0QIQN0Z03zE4qLgaICqOw-7jX1llm48lY6yUBW8bnaqmkPtbvrhUczJ-9GBEH4J_x8sY0n4z6moixI5a/s144/button_bg.png'), url('https://blogger.googleusercontent.com/img/b/R29vZ2xl/AVvXsEiG5YW6fSSZknCR7W6D6vZBNkoULKIYAW2sUbEYjUNCPOsGsKolewVLy6m2niap0QIQN0Z03zE4qLgaICqOw-7jX1llm48lY6yUBW8bnaqmkPtbvrhUczJ-9GBEH4J_x8sY0n4z6moixI5a/s144/button_bg.png') ,-webkit-gradient(radial,50% 100%,0,50% 100%,100,from(rgba(162,211,30,1) ),to(rgba(162,211,30,0) )),-webkit-gradient(linear,0% 0,0% 100%,from(#82cc27),to(#74b317));}
.green.button:hover {background-color: #89d228;background-image: url('https://blogger.googleusercontent.com/img/b/R29vZ2xl/AVvXsEiG5YW6fSSZknCR7W6D6vZBNkoULKIYAW2sUbEYjUNCPOsGsKolewVLy6m2niap0QIQN0Z03zE4qLgaICqOw-7jX1llm48lY6yUBW8bnaqmkPtbvrhUczJ-9GBEH4J_x8sY0n4z6moixI5a/s144/button_bg.png'), url('https://blogger.googleusercontent.com/img/b/R29vZ2xl/AVvXsEiG5YW6fSSZknCR7W6D6vZBNkoULKIYAW2sUbEYjUNCPOsGsKolewVLy6m2niap0QIQN0Z03zE4qLgaICqOw-7jX1llm48lY6yUBW8bnaqmkPtbvrhUczJ-9GBEH4J_x8sY0n4z6moixI5a/s144/button_bg.png') ,-moz-radial-gradient(center bottom,circle,rgba(183,229,45,1) 0,rgba(183,229,45,0) 100px),-moz-linear-gradient(#90de31,#7fc01e);background-image: url('https://blogger.googleusercontent.com/img/b/R29vZ2xl/AVvXsEiG5YW6fSSZknCR7W6D6vZBNkoULKIYAW2sUbEYjUNCPOsGsKolewVLy6m2niap0QIQN0Z03zE4qLgaICqOw-7jX1llm48lY6yUBW8bnaqmkPtbvrhUczJ-9GBEH4J_x8sY0n4z6moixI5a/s144/button_bg.png'), url('https://blogger.googleusercontent.com/img/b/R29vZ2xl/AVvXsEiG5YW6fSSZknCR7W6D6vZBNkoULKIYAW2sUbEYjUNCPOsGsKolewVLy6m2niap0QIQN0Z03zE4qLgaICqOw-7jX1llm48lY6yUBW8bnaqmkPtbvrhUczJ-9GBEH4J_x8sY0n4z6moixI5a/s144/button_bg.png') ,-webkit-gradient(radial,50% 100%,0,50% 100%,100,from(rgba(183,229,45,1) ),to(rgba(183,229,45,0) )),-webkit-gradient(linear,0% 0,0% 100%,from(#90de31),to(#7fc01e));}
.orange.button {border: 1px solid #bea280!important;color: #693e0a!important;background-color: #e38d27;background-image: url('https://blogger.googleusercontent.com/img/b/R29vZ2xl/AVvXsEiG5YW6fSSZknCR7W6D6vZBNkoULKIYAW2sUbEYjUNCPOsGsKolewVLy6m2niap0QIQN0Z03zE4qLgaICqOw-7jX1llm48lY6yUBW8bnaqmkPtbvrhUczJ-9GBEH4J_x8sY0n4z6moixI5a/s144/button_bg.png'), url('https://blogger.googleusercontent.com/img/b/R29vZ2xl/AVvXsEiG5YW6fSSZknCR7W6D6vZBNkoULKIYAW2sUbEYjUNCPOsGsKolewVLy6m2niap0QIQN0Z03zE4qLgaICqOw-7jX1llm48lY6yUBW8bnaqmkPtbvrhUczJ-9GBEH4J_x8sY0n4z6moixI5a/s144/button_bg.png') ,-moz-radial-gradient(center bottom,circle,rgba(232,189,45,1) 0,rgba(232,189,45,0) 100px),-moz-linear-gradient(#f1982f,#d4821f);background-image: url('https://blogger.googleusercontent.com/img/b/R29vZ2xl/AVvXsEiG5YW6fSSZknCR7W6D6vZBNkoULKIYAW2sUbEYjUNCPOsGsKolewVLy6m2niap0QIQN0Z03zE4qLgaICqOw-7jX1llm48lY6yUBW8bnaqmkPtbvrhUczJ-9GBEH4J_x8sY0n4z6moixI5a/s144/button_bg.png'), url('https://blogger.googleusercontent.com/img/b/R29vZ2xl/AVvXsEiG5YW6fSSZknCR7W6D6vZBNkoULKIYAW2sUbEYjUNCPOsGsKolewVLy6m2niap0QIQN0Z03zE4qLgaICqOw-7jX1llm48lY6yUBW8bnaqmkPtbvrhUczJ-9GBEH4J_x8sY0n4z6moixI5a/s144/button_bg.png') ,-webkit-gradient(radial,50% 100%,0,50% 100%,100,from(rgba(232,189,45,1) ),to(rgba(232,189,45,0) )),-webkit-gradient(linear,0% 0,0% 100%,from(#f1982f),to(#d4821f));}
.orange.button:hover {background-color: #ec9732;background-image: url('https://blogger.googleusercontent.com/img/b/R29vZ2xl/AVvXsEiG5YW6fSSZknCR7W6D6vZBNkoULKIYAW2sUbEYjUNCPOsGsKolewVLy6m2niap0QIQN0Z03zE4qLgaICqOw-7jX1llm48lY6yUBW8bnaqmkPtbvrhUczJ-9GBEH4J_x8sY0n4z6moixI5a/s144/button_bg.png'), url('https://blogger.googleusercontent.com/img/b/R29vZ2xl/AVvXsEiG5YW6fSSZknCR7W6D6vZBNkoULKIYAW2sUbEYjUNCPOsGsKolewVLy6m2niap0QIQN0Z03zE4qLgaICqOw-7jX1llm48lY6yUBW8bnaqmkPtbvrhUczJ-9GBEH4J_x8sY0n4z6moixI5a/s144/button_bg.png') ,-moz-radial-gradient(center bottom,circle,rgba(241,192,52,1) 0,rgba(241,192,52,0) 100px),-moz-linear-gradient(#f9a746,#e18f2b);background-image: url('https://blogger.googleusercontent.com/img/b/R29vZ2xl/AVvXsEiG5YW6fSSZknCR7W6D6vZBNkoULKIYAW2sUbEYjUNCPOsGsKolewVLy6m2niap0QIQN0Z03zE4qLgaICqOw-7jX1llm48lY6yUBW8bnaqmkPtbvrhUczJ-9GBEH4J_x8sY0n4z6moixI5a/s144/button_bg.png'), url('https://blogger.googleusercontent.com/img/b/R29vZ2xl/AVvXsEiG5YW6fSSZknCR7W6D6vZBNkoULKIYAW2sUbEYjUNCPOsGsKolewVLy6m2niap0QIQN0Z03zE4qLgaICqOw-7jX1llm48lY6yUBW8bnaqmkPtbvrhUczJ-9GBEH4J_x8sY0n4z6moixI5a/s144/button_bg.png') ,-webkit-gradient(radial,50% 100%,0,50% 100%,100,from(rgba(241,192,52,1) ),to(rgba(241,192,52,0) )),-webkit-gradient(linear,0% 0,0% 100%,from(#f9a746),to(#e18f2b));}
.gray.button {border: 1px solid #a5a5a5!important;color: #525252!important;background-color: #a9adb1;background-image: url('https://blogger.googleusercontent.com/img/b/R29vZ2xl/AVvXsEiG5YW6fSSZknCR7W6D6vZBNkoULKIYAW2sUbEYjUNCPOsGsKolewVLy6m2niap0QIQN0Z03zE4qLgaICqOw-7jX1llm48lY6yUBW8bnaqmkPtbvrhUczJ-9GBEH4J_x8sY0n4z6moixI5a/s144/button_bg.png'), url('https://blogger.googleusercontent.com/img/b/R29vZ2xl/AVvXsEiG5YW6fSSZknCR7W6D6vZBNkoULKIYAW2sUbEYjUNCPOsGsKolewVLy6m2niap0QIQN0Z03zE4qLgaICqOw-7jX1llm48lY6yUBW8bnaqmkPtbvrhUczJ-9GBEH4J_x8sY0n4z6moixI5a/s144/button_bg.png') ,-moz-radial-gradient(center bottom,circle,rgba(197,199,202,1) 0,rgba(197,199,202,0) 100px),-moz-linear-gradient(#c5c7ca,#92989c);background-image: url('https://blogger.googleusercontent.com/img/b/R29vZ2xl/AVvXsEiG5YW6fSSZknCR7W6D6vZBNkoULKIYAW2sUbEYjUNCPOsGsKolewVLy6m2niap0QIQN0Z03zE4qLgaICqOw-7jX1llm48lY6yUBW8bnaqmkPtbvrhUczJ-9GBEH4J_x8sY0n4z6moixI5a/s144/button_bg.png'), url('https://blogger.googleusercontent.com/img/b/R29vZ2xl/AVvXsEiG5YW6fSSZknCR7W6D6vZBNkoULKIYAW2sUbEYjUNCPOsGsKolewVLy6m2niap0QIQN0Z03zE4qLgaICqOw-7jX1llm48lY6yUBW8bnaqmkPtbvrhUczJ-9GBEH4J_x8sY0n4z6moixI5a/s144/button_bg.png') ,-webkit-gradient(radial,50% 100%,0,50% 100%,100,from(rgba(197,199,202,1) ),to(rgba(197,199,202,0) )),-webkit-gradient(linear,0% 0,0% 100%,from(#c5c7ca),to(#92989c));}
.gray.button:hover {background-color: #b6bbc0;background-image: url('https://blogger.googleusercontent.com/img/b/R29vZ2xl/AVvXsEiG5YW6fSSZknCR7W6D6vZBNkoULKIYAW2sUbEYjUNCPOsGsKolewVLy6m2niap0QIQN0Z03zE4qLgaICqOw-7jX1llm48lY6yUBW8bnaqmkPtbvrhUczJ-9GBEH4J_x8sY0n4z6moixI5a/s144/button_bg.png'), url('https://blogger.googleusercontent.com/img/b/R29vZ2xl/AVvXsEiG5YW6fSSZknCR7W6D6vZBNkoULKIYAW2sUbEYjUNCPOsGsKolewVLy6m2niap0QIQN0Z03zE4qLgaICqOw-7jX1llm48lY6yUBW8bnaqmkPtbvrhUczJ-9GBEH4J_x8sY0n4z6moixI5a/s144/button_bg.png') ,-moz-radial-gradient(center bottom,circle,rgba(202,205,208,1) 0,rgba(202,205,208,0) 100px),-moz-linear-gradient(#d1d3d6,#9fa5a9);background-image: url('https://blogger.googleusercontent.com/img/b/R29vZ2xl/AVvXsEiG5YW6fSSZknCR7W6D6vZBNkoULKIYAW2sUbEYjUNCPOsGsKolewVLy6m2niap0QIQN0Z03zE4qLgaICqOw-7jX1llm48lY6yUBW8bnaqmkPtbvrhUczJ-9GBEH4J_x8sY0n4z6moixI5a/s144/button_bg.png'), url('https://blogger.googleusercontent.com/img/b/R29vZ2xl/AVvXsEiG5YW6fSSZknCR7W6D6vZBNkoULKIYAW2sUbEYjUNCPOsGsKolewVLy6m2niap0QIQN0Z03zE4qLgaICqOw-7jX1llm48lY6yUBW8bnaqmkPtbvrhUczJ-9GBEH4J_x8sY0n4z6moixI5a/s144/button_bg.png') ,-webkit-gradient(radial,50% 100%,0,50% 100%,100,from(rgba(202,205,208,1) ),to(rgba(202,205,208,0) )),-webkit-gradient(linear,0% 0,0% 100%,from(#d1d3d6),to(#9fa5a9));}
- After adding this CSS Script Save the template!
- Now Add any of the below HTML Code/Script in Post where you want to appear the Buttons.
HTML For Large Size Buttons
<a class="button big blue" href="#">text</a>
<a class="button big green" href="#">text</a>
<a class="button big orange" href="#">text</a>
<a class="button big gray" href="#">Text</a>
HTML For Media Size buttons
<a class="button medium blue" href="#">text</a>Customization : Replace # in the script(HTML) with the URL and Text with the Anchor Text .
<a class="button medium green" href="#">text</a>
<a class="button medium orange" href="#">text</a>
<a class="button medium gray" href="#">Text</a>
So What's Up : Adding these Bubble Buttons makes your post more attractive and Cool.So if You Can why not implement it?Stay Blessed , Happy Blogging!