Showing posts with label Blogger Tricks. Show all posts

Monday, 7 January 2013

Pure CSS3 Multi Level Drop Down Menu For Blogger V1

0 comments
I recently posted Add Smooth Multi Level Drop-Down Menu In Blogger. But this is simple, smooth not just a perfect good looking Stylish Pure CSS3 Multi Level Drop Down Menu. Now I comes with Stylish Pure CSS3 Multi Level Drop Down Menu For Blogger. This menu is purely designed with CSS3 and No Images, No javascript is included in it. It is compatible for almost all browsers like Mozilla Firefox and Google Chrome etc but the rounded corners and shadow will not be rendered properly. This menu is provided bywebDesignerWall. I have made installation method very easy you just need to copy and paste the code to where you want Multi Level Drop Down Menu to appear.

Pure CSS3 Multi Level Drop Down Menu Preview

Add Multi Level Drop Down Menu To Blogger

  1. Go To Blogger > Design
  2. Click on “Add a Gadget”
  3. Choose HTML/Javascript widget
  4. Paste the following code inside it
<style>
#ABT-Container  {
    font: normal .8em/1.5em Arial, Helvetica, sans-serif;
    background: #ebebeb;
     width:100%; float:left;    
}

a {
    color: #333;
}
#nav {
    margin: 0;
    padding: 7px 6px 0;
    line-height: 100%;
    border-radius: 2em;

    -webkit-border-radius: 2em;
    -moz-border-radius: 2em;
    
    -webkit-box-shadow: 0 1px 3px rgba(0, 0, 0, .4);
    -moz-box-shadow: 0 1px 3px rgba(0, 0, 0, .4);

    background: #8b8b8b; /* for non-css3 browsers */
    filter:  progid:DXImageTransform.Microsoft.gradient(startColorstr='#a9a9a9', endColorstr='#7a7a7a'); /* for IE */
    background: -webkit-gradient(linear, left top, left bottom, from(#a9a9a9), to(#7a7a7a)); /* for webkit browsers */
    background: -moz-linear-gradient(top,  #a9a9a9,  #7a7a7a); /* for firefox 3.6+ */

    border: solid 1px #6d6d6d;
}
#nav li {
    margin: 0 5px;
    padding: 0 0 8px;
    float: left;
    position: relative;
    list-style: none;
}
/* main level link */
#nav a {
    font-weight: bold;
    color: #e7e5e5;
    text-decoration: none;
    display: block;
    padding:  8px 20px;
    margin: 0;
    -webkit-border-radius: 1.6em;
    -moz-border-radius: 1.6em;
    text-shadow: 0 1px 1px rgba(0, 0, 0, .3);
}
/* main level link hover */
#nav .current a, #nav li:hover > a {
    background: #d1d1d1; /* for non-css3 browsers */
    filter:  progid:DXImageTransform.Microsoft.gradient(startColorstr='#ebebeb', endColorstr='#a1a1a1'); /* for IE */
    background: -webkit-gradient(linear, left top, left bottom, from(#ebebeb), to(#a1a1a1)); /* for webkit browsers */
    background: -moz-linear-gradient(top,  #ebebeb,  #a1a1a1); /* for firefox 3.6+ */

    color: #444;
    border-top: solid 1px #f8f8f8;
    -webkit-box-shadow: 0 1px 1px rgba(0, 0, 0, .2);
    -moz-box-shadow: 0 1px 1px rgba(0, 0, 0, .2);
    box-shadow: 0 1px 1px rgba(0, 0, 0, .2);
    text-shadow: 0 1px 0 rgba(255, 255, 255, .8);
}
/* sub levels link hover */
#nav ul li:hover a, #nav li:hover li a {
    background: none;
    border: none;
    color: #666;
    -webkit-box-shadow: none;
    -moz-box-shadow: none;
}
#nav ul a:hover {
    background: #0399d4 !important; /* for non-css3 browsers */
    filter:  progid:DXImageTransform.Microsoft.gradient(startColorstr='#04acec', endColorstr='#0186ba'); /* for IE */
    background: -webkit-gradient(linear, left top, left bottom, from(#04acec), to(#0186ba)) !important; /* for webkit browsers */
    background: -moz-linear-gradient(top,  #04acec,  #0186ba) !important; /* for firefox 3.6+ */

    color: #fff !important;
    -webkit-border-radius: 0;
    -moz-border-radius: 0;
    text-shadow: 0 1px 1px rgba(0, 0, 0, .1);
}
/* level 2 list */
#nav ul {
    background: #ddd; /* for non-css3 browsers */
    filter:  progid:DXImageTransform.Microsoft.gradient(startColorstr='#ffffff', endColorstr='#cfcfcf'); /* for IE */
    background: -webkit-gradient(linear, left top, left bottom, from(#fff), to(#cfcfcf)); /* for webkit browsers */
    background: -moz-linear-gradient(top,  #fff,  #cfcfcf); /* for firefox 3.6+ */

    display: none;
    margin: 0;
    padding: 0;
    width: 185px;
    position: absolute;
    top: 35px;
    left: 0;
    border: solid 1px #b4b4b4;
    -webkit-border-radius: 10px;
    -moz-border-radius: 10px;
    border-radius: 10px;
    -webkit-box-shadow: 0 1px 3px rgba(0, 0, 0, .3);
    -moz-box-shadow: 0 1px 3px rgba(0, 0, 0, .3);
    box-shadow: 0 1px 3px rgba(0, 0, 0, .3);
}
/* dropdown */
#nav li:hover > ul {
    display: block;
}
#nav ul li {
    float: none;
    margin: 0;
    padding: 0;
}
#nav ul a {
    font-weight: normal;
    text-shadow: 0 1px 1px rgba(255, 255, 255, .9);
}
/* level 3+ list */
#nav ul ul {
    left: 181px;
    top: -3px;
}
/* rounded corners for first and last child */
#nav ul li:first-child > a {
    -webkit-border-top-left-radius: 9px;
    -moz-border-radius-topleft: 9px;
    -webkit-border-top-right-radius: 9px;
    -moz-border-radius-topright: 9px;
}
#nav ul li:last-child > a {
    -webkit-border-bottom-left-radius: 9px;
    -moz-border-radius-bottomleft: 9px;
    -webkit-border-bottom-right-radius: 9px;
    -moz-border-radius-bottomright: 9px;
}
/* clearfix */
#nav:after {
    content: ".";
    display: block;
    clear: both;
    visibility: hidden;
    line-height: 0;
    height: 0;
}
#nav {
    display: inline-block;
}
html[xmlns] #nav {
    display: block;
}
* html #nav {
    height: 1%;
}
</style>

<div id="ABT-Container">
<ul id="nav"><li><a href="#">Home</a></li>
<li><a href="#">Technology Tricks</a>
<ul>
<li><a href="#">Sub-Row</a>
<ul>
<li><a href="#">Sub Sub-Row 1</a></li>
</a></li></ul>
</li>
<li><a href="#">Sub-Row</a>
<ul>
               
<li><a href="#">Sub Sub-Row 2</a></li>
</ul>
</li>
<li><a href="#">Sub-Row</a></li>
</ul>
</li>

<li><a href="#">Multi-Levels</a>
<ul>
<li><a href="#">Team</a>
<ul>
<li><a href="#">Sub-Level Item 1</a></li>
<li><a href="#">Sub-Level Item 1</a>
<ul>
<li><a href="#">Sub-Level Item 11</a></li>
<li><a href="#">Sub-Level Item 22</a></li>
<li><a href="#">Sub-Level Item 33</a></li>
</ul>
</li>
                   
<li><a href="#">Sub-Level Item 1</a></li>
</ul>
</li>
<li><a href="#">Sales</a></li>
<li><a href="#">Another Link</a></li>
<li><a href="#">Department</a>
<ul>
<li><a href="#">Sub-Level Item 2</a></li>
</ul>
</li>
</ul>
</li><li><a href="#">Home</a></li>   
<li><a href="#">About Me</a></li>
<li><a href="#">Contact Me</a></li>
<li><a href="#">Blogger Tutorials</a></li>


</ul>
</div>

The best part about this Multi Level Drop Down Menu is that you can give it any colour you want because here we are using a transparent gradient image which can take any colour you want. Like:

Now kindly make these customization changes to add your own links to menu:
  • Each TAB can be edited by directly understanding the following  HTML code,
<li><a href=”#“>TAB TEXT</a></li>
In each case replace the hash sign (#) with your page URL or link and replace the text with your page title. I have kept the page titles unchanged in the code above so that you could easily edit them by seeing the demo.
This is V1 of Multi Level Drop Down Menu. I will soon publish another article on this cool Multi Level Drop Down Menu. Till than stay tune!

Confused or Need Help?

If you need some extra help in removing rows or columns then please feel free to post your questions. You can discus it as much with me as possible. This will help others to better understand on how to make further changes. :D

Add Smooth Multi Level Drop-Down Menu In Blogger

0 comments
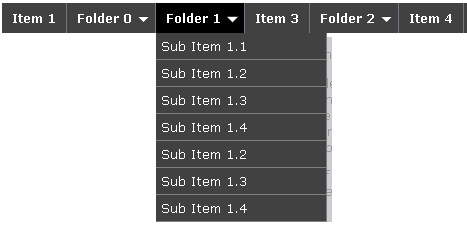
Now you can easily Add Navigation Menu in Blogger with ease. Smooth Navigation Menu is a multi level, CSS list based menu powered using jQuery that makes website navigation a smooth and that’s a good thing given the important role of this element in any site.


Steps To Add Smooth Multi Level Drop-Down Menu In Blogger

Note: Before making any changes to your template, take a full backup of your blogger template.
#Step 1. Log in to your Blogger Dashboard and Navigate to Design > Edit HTML.
Design Edit HTML

#Step 2. Find this code:</head> and replace it wit this code:
<link href=’https://sites.google.com/site/addinblogger/how-to-add-in-blogger/ddsmoothmenu.css’ rel=’stylesheet’ type=’text/css’/>
<link href=’https://sites.google.com/site/addinblogger/how-to-add-in-blogger/ddsmoothmenu-v.css’ rel=’stylesheet’ type=’text/css’/>
<script src=’http://ajax.googleapis.com/ajax/libs/jquery/1.2.6/jquery.min.js’ type=’text/javascript’/>
<script src=’https://sites.google.com/site/addinblogger/how-to-add-in-blogger/ddsmoothmenu.js’ type=’text/javascript’>
/***********************************************
* Smooth Navigational Menu- (c) Dynamic Drive DHTML code library (www.dynamicdrive.com)
* This notice MUST stay intact for legal use
* Visit Dynamic Drive at http://www.dynamicdrive.com/ for full source code
***********************************************/
</script>
<script type=’text/javascript’>
ddsmoothmenu.init({
mainmenuid: “smoothmenu1″, //menu DIV id
orientation: ‘h’, //Horizontal or vertical menu: Set to “h” or “v”
classname: ‘ddsmoothmenu’, //class added to menu’s outer DIV
//customtheme: ["#1c5a80", "#18374a"],
contentsource: “markup” //”markup” or ["container_id", "path_to_menu_file"] })
ddsmoothmenu.init({
mainmenuid: “smoothmenu2″, //Menu DIV id
orientation: ‘v’, //Horizontal or vertical menu: Set to “h” or “v”
classname: ‘ddsmoothmenu-v’, //class added to menu’s outer DIV
//customtheme: ["#804000", "#482400"],
contentsource: “markup” //”markup” or ["container_id", "path_to_menu_file"] })
</script>
</head>
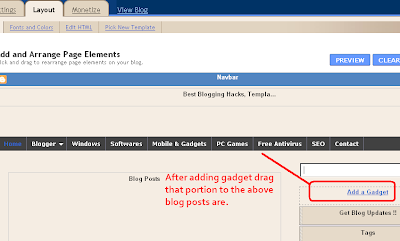
#Step 3. Now navigate to Design > Page Element and click on Add a Gadget > HTML/Javascript and insert the following code and click Save button.
Design-Page Element
<h2>Example 1</h2>
<div id=”smoothmenu1″>
<ul>
<li><a href=”http://bloggerhowtotips.blogspot.com/”>Blogger How To Tips</a></li>
<li><a href=”#”>Folder 0</a>
<ul>
<li><a href=”#”>Sub Item 1.1</a></li>
<li><a href=”#”>Sub Item 1.2</a></li>
<li><a href=”#”>Sub Item 1.3</a></li>
<li><a href=”#”>Sub Item 1.4</a></li>
<li><a href=”#”>Sub Item 1.2</a></li>
<li><a href=”#”>Sub Item 1.3</a></li>
<li><a href=”#”>Sub Item 1.4</a></li>
</ul>
</li>
<li><a href=”#”>Folder 1</a>
<ul>
<li><a href=”#”>Sub Item 1.1</a></li>
<li><a href=”#”>Sub Item 1.2</a></li>
<li><a href=”#”>Sub Item 1.3</a></li>
<li><a href=”#”>Sub Item 1.4</a></li>
<li><a href=”#”>Sub Item 1.2</a></li>
<li><a href=”#”>Sub Item 1.3</a></li>
<li><a href=”#”>Sub Item 1.4</a></li>
</ul>
</li>
<li><a href=”#”>Item 3</a></li>
<li><a href=”#”>Folder 2</a>
<ul>
<li><a href=”#”>Sub Item 2.1</a></li>
<li><a href=”#”>Folder 2.1</a>
<ul>
<li><a href=”#”>Sub Item 2.1.1</a></li>
<li><a href=”#”>Sub Item 2.1.2</a></li>
<li><a href=”#”>Folder 3.1.1</a>
<ul>
<li><a href=”#”>Sub Item 3.1.1.1</a></li>
<li><a href=”#”>Sub Item 3.1.1.2</a></li>
<li><a href=”#”>Sub Item 3.1.1.3</a></li>
<li><a href=”#”>Sub Item 3.1.1.4</a></li>
<li><a href=”#”>Sub Item 3.1.1.5</a></li>
</ul>
</li>
<li><a href=”#”>Sub Item 2.1.4</a></li>
</ul>
</li>
</ul>
</li>
<li><a href=”http://allbloggingtips.com/”>All Blogging Tips</a></li>
</ul>
<br style=”clear: left” />
</div>
<h2 style=”margin-top:200px”>Example 2</h2>
<div id=”smoothmenu2″>
<ul>
<li><a href=”http://allbloggingtips.com/”>Blogger Tips and Tricks</a></li>
<li><a href=”#”>Folder 0</a>
<ul>
<li><a href=”#”>Sub Item 1.1</a></li>
<li><a href=”#”>Sub Item 1.2</a></li>
<li><a href=”#”>Sub Item 1.3</a></li>
<li><a href=”#”>Sub Item 1.4</a></li>
<li><a href=”#”>Sub Item 1.2</a></li>
<li><a href=”#”>Sub Item 1.3</a></li>
<li><a href=”#”>Sub Item 1.4</a></li>
</ul>
</li>
<li><a href=”#”>Folder 1</a>
<ul>
<li><a href=”#”>Sub Item 1.1</a></li>
<li><a href=”#”>Sub Item 1.2</a></li>
<li><a href=”#”>Sub Item 1.3</a></li>
<li><a href=”#”>Sub Item 1.4</a></li>
<li><a href=”#”>Sub Item 1.2</a></li>
<li><a href=”#”>Sub Item 1.3</a></li>
<li><a href=”#”>Sub Item 1.4</a></li>
</ul>
</li>
<li><a href=”#”>Item 3</a></li>
<li><a href=”#”>Folder 2</a>
<ul>
<li><a href=”#”>Sub Item 2.1</a></li>
<li><a href=”#”>Folder 2.1</a>
<ul>
<li><a href=”#”>Sub Item 2.1.1</a></li>
<li><a href=”#”>Sub Item 2.1.2</a></li>
<li><a href=”#”>Folder 3.1.1</a>
<ul>
<li><a href=”#”>Sub Item 3.1.1.1</a></li>
<li><a href=”#”>Sub Item 3.1.1.2</a></li>
<li><a href=”#”>Sub Item 3.1.1.3</a></li>
<li><a href=”#”>Sub Item 3.1.1.4</a></li>
<li><a href=”#”>Sub Item 3.1.1.5</a></li>
</ul>
</li>
<li><a href=”#”>Sub Item 2.1.4</a></li>
</ul>
</li>
</ul>
</li>
<li><a href=”http://allbloggingtips.com/”>All Blogspot Tips</a></li>
</ul>
<br style=”clear: left” />
</div>
#Step 4. Save template and done!.
add menu in blogger

After adding the menu your blog layout will be look like in image above, as usual if you have any doubt please comment.

Saturday, 5 January 2013

7 Killer SEO Steps to Optimize Your Website in SERP

0 comments

SEO optimize your blog or make it appear on top Search Engine Results to enhance the traffic on your site. Basically, the thing matters here, is to figure out the keywords on which you want the visitors to reach your site through Search Engine Results Page (SERP). If you are new to blogging and SEO in particular, you should be aware of some basic SEO tips to improve your site’s ranking in the SERPs.

7 Killer SEO Steps to Optimize Your Website in SERP


1. Keywords in Title Tag

Title Tag is one of the most significant elements to position your webpage higher in your chosen keyword. This tag gets visible in the clickable link on the SERPs. It’s better to start your title with a long-tail keyword having less competition. Try to use your Keyword within the range of 65 characters, as search engine don’t consider anything after 65 character limit. Don’t repeat your Keyword in your title; otherwise your site could be penalized.

2. Use Keywords in Header Tags

Header tags are one of the most imperative On-page search engine optimization factors. Use the similar keywords in all heading tags. This way, you can easily bring focus of the page on a sole keyword while getting superiority in the Search Engines. You should better utilize your main keyword in first heading tag while trying to keep the Keyword at first.

3. Use Keywords in Image Alt tag

Images can express many words but SE Spiders don’t translate images, they only read the alt tag to understand the image with textual description. Therefore, it is vital to provide a significant description of an image with using keywords. It will optimize the images used in your content and rank them higher in image searches.

4. The Power of Internal Linking

One significant factor of SEO that is often ignored is Internal Linking. The better approach is to reactivate and revitalize the old posts in archive, as compared to link them in your fresh posts. Don’t miscalculate the authority of internal linking in the distribution of page rank.

5. Links from Directories

Planting in directories, such as Yahoo, DMOZ and other article and content listings can be quite helpful to achieve positive ranking overall. Some people believe that it’s not possible to list your content on DMOZ, especially if you don’t have much credible data, but if you could, it may bring you positive results.

6. Use Meta Description

Though Google is now giving less importance to meta-tags, there are two meta-tags that still matter in SEO, But, Meta description Tag still has importance from a human and search engine perspective. Description meta-tag is what you use to illustrate your website. In fact, this description is what the visitors see when your site appears on the search results.

7. Use Keywords Meta Tag

Fill your Keyword tags with relevant keywords while avoiding replicas and Keyword stuffing. The Keywords you mention in the keyword tag should be relevant to the context of your page. Keywords used in meta-keywords-tag must somehow appear somewhere within the body of text. Otherwise, your webpage can be penalized for irrelevant content.

3 Ways To Add Floating Go To Top Button In WordPress Blogs

0 comments
We all don’t want to lose visitors. When after scrolling long deep pages, if a readers has to go back to top of page, he/she has to do this by pressing the up button located on the right side of our browser, which is very annoying.


But don’t worry you can now make  your visitors stay on your blog by using How TO Add Floating Go To Top Button In WordPress Blogs. This will Add Floating Go To Top Button In WordPress Blogs which will help you go back to top of page with just one click, no matter what is the position of the page, even if you are half way down the post, you can click this button to go back to top.

3 Ways To Add Floating Go To Top Button In WordPress Blogs

1. Add Simple Code To Your Blog (Best Way)
2. Use Scroll To Top WordPress Plugin
3. Use Go To Top WordPress Plugin

1. Add Simple Code To Your Blog.

This is simple, best way to add code to your blog. This will also add a cool image but you can change it to your own image.

  • Goto WordPress Dashboard > Appearance >Widget
  • Drop a Text Widget to your sidebar.
  • Now Paste below code in Text Widget
 <a style=”display:scroll;position:fixed;bottom:5px;right:5px;” href=”#” title=”Back to Top”><img src=”https://blogger.googleusercontent.com/img/b/R29vZ2xl/AVvXsEgV-Vda8P6v8runXZ6h5S8StEYMDV-rxGlZzhGG7HkYEdGl7wRCEfaKxYUwVBp8A0vT_JWBEesbrlEmc2w8uNfimLa6s2vaQ71mdSnyZUUw5wvTZJUlf24RMScZAq7IGfzZSlezTKd-JeE/”/></a>
  • Click on Save Button and See the magic!
Note: You can also add image you want to do so just replace https://blogger.googleusercontent.com/img/b/R29vZ2xl/AVvXsEgV-Vda8P6v8runXZ6h5S8StEYMDV-rxGlZzhGG7HkYEdGl7wRCEfaKxYUwVBp8A0vT_JWBEesbrlEmc2w8uNfimLa6s2vaQ71mdSnyZUUw5wvTZJUlf24RMScZAq7IGfzZSlezTKd-JeE/ with your image url.

2. Use Scroll To Top WordPress Plugin.

Fully written in jQuery, the plugin adds a floating box centered in the footer of your site that only appears when you scroll the page down, and when clicked gently roll the site to the top. All this without any modification to your template.
How To use it?

  • Download Plugin Here
  • You can either use the automatic plugin installer or your FTP program to upload it to your wp-content/plugins directory the top-level folder. Don’t just upload all the php files and put them in /wp-content/plugins/.
  • Activate the plugin through the ‘Plugins’ menu in WordPress
  • Visit your Scroll to Top Options (Options – Scroll to Top)
  • Configure any options as desired, and then enable the plugin
  • That’s it!

3. Use Go To Top WordPress Plugin.

This plugin will Add a “Go to top” link to your posts. This is a wordpress plugin which based on jQuery, jQuery Easing and Scroll to Top v3
How To use it?
  1. Download Plugin Here
  2. Upload the plugin folder to the /wp-content/plugins/ directory or use Dashboard Method
  3. Activate the plugin through the ‘Plugins’ menu in WordPress
That’s All. Hope you will like this post. If you face any problem just Share your views through comment.


How To Easily Create Animated Favicons And Add It To Blogger

0 comments


Favicon is actually the icon that appears next to your Website URL in the browser address bar. A favicon is usually your blog logo. There are many services which only provide you facility to add image to favicons only. But now you can Create Animated Favicons which will allow you to add image with animating text. I will show you How To Easily Create Animated Favicons And Add It To Blogger.

Steps To Easily Create Animated Favicons?

  • Goto FaviconGenerator
  • And Just goto Bottom of the page. Upload your image which you want to use for favicon and type desire text which you want to make animating You will find all the help at favicongenerator


  • Hit the Generate Favicon Button and you will be taken to this page,


Here you will see many images just right click the animated one and save it to your computer.

How To Add Animated Favicons In Blogger

    • Go To Blogger > Design > Edit HTML
    • And Search For <b:skin>and just above it paste the code below,
<link href='ADD YOUR FAVICON LINK HERE' rel='icon" type='image/gif'/>
  • Replace ADD YOUR FAVICON LINK HERE with the image URL of the favicon you saved in Picasa album.
  • Save your template and you are done!
View your blog to see it in action on the address bar and tabs. Hope you liked it! Questions are always welcomed here:>>

Add Goolge+ Page Badge to your Blog

0 comments
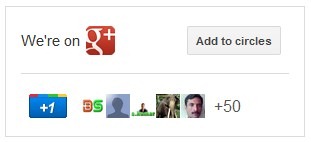
The badge lets users add your Google Plus page to their circles without leaving your blog,its like Facebook’s Like Box, but better. Google+ badge will not only promote your awesome blog on Google+ , but will help it rank in Google search results as well.

I) Adding Google+ Page Badge

Adding To Blogger

  • Go to Design > Page Elements.
    Click Add Gadget and select HTML/Javascript gadget.
    Copy the code below ,  paste it  in that box.

Adding To WordPress

    1. Go to Dashboard => Appearance => Widgets => Available Widgets.
    2. Drag Text widget into your sidebar.
    3. Paste above codein the code. Save.
<!-- Google +1 script -->
<script type="text/javascript">
(function() {
var po = document.createElement('script'); po.type = 'text/javascript'; po.async = true;
po.src = 'https://apis.google.com/js/plusone.js';
var s = document.getElementsByTagName('script')[0]; s.parentNode.insertBefore(po, s);
})();
</script>
<!-- Link blog to Google+ page -->
<a style='display: block; height: 0;' href="PUT YOUR G+ PAGE URL HERE" rel="publisher">&nbsp;</a>
<!-- Google +1 Page badge -->
<g:plus href="PUT YOUR G+ PAGE URL HERE" height="131" width="300" theme="light"></g:plus>
      • Replace PUT YOUR G+ PAGE URL HERE with the URL of your Google+ page.
      • To get the page URL: Login to Google+ > Switch to your page via the dropdown menu on top left corner of your screen right under your profile name > Get the URL from your browser’s address bar.

II) Customizing Google + page badge

Currently you can only customize the size of the badge,  by setting the size attribute on the badge tag in line 12.
Size
Badge
Size attribute
Big
Google plus page big badge
badge
Small
Google plus page small badge
smallbadge
Note: If your Google Plus  page badge name is short enough, the “We’re on” phrase in front of the red G+ button will be replaced by  “[PageName] on”.
Thanks  Blogger Sentral for Code !

How to Add Three Column Footer Widget in Blogger

0 comments
You might have seen a three column footer at many professional or commercial blogs. Where you can add stuffs. Take my three column footer as example. Footer make visitors busy and give him a good impression at End of your blog. It contains 3 columns widgets where you can add your own choice of widgets. You can easily Three Column Footer Widget and customize it as you want. If you are using WordPress Thesis Theme than check out this tutorial to add Footer Widget  in Thesis. See a screenshot.


How To Add Three Column Footer Widget In Blogger (Updated)

Follow these steps, to add Three Column Footer Widget
Step 1:
Go to Blogger Dashboard > Design > Edit Html
Step 2:
Backup Your Template
Step 3:
Search for ]]></b:skin> now paste the following CSS code just above ]]></b:skin>
#lower {
border-top: #737373 6px solid;
margin:auto;
font-family: Georgia;
width: 960px;
padding: 0px 0px 10px 0px;
background:#1f1f1f;
}
#lower a {
color: #DBDBDB;
font-family: Georgia;
}
#lower-wrapper {
margin:auto;
font-family: Georgia;
padding: 20px 0px 20px 0px;
width: 960px;
}
#lowerbar-wrapper {
background:#1f1f1f;
float: left;
color: #ebedee;
font-family: Georgia;
margin: 0px 5px auto;
padding-bottom: 20px;
width: 32%;
text-align: justify;
font-size:100%;
line-height: 1.6em;
word-wrap: break-word;
overflow: hidden;
}
.lowerbar {margin: 0; padding: 0;}
.lowerbar .widget {margin: 0; padding: 10px 20px 0px 20px;}
.lowerbar h2 {
margin: 0px 0px 10px 0px;
padding: 3px 0px 3px 0px;
text-align: left;
color:#fff;
text-transform:uppercase;
font: bold 16px Arial, Tahoma, Verdana;
border-bottom:3px solid #666666;
}
.lowerbar ul {
list-style:none;
margin: 0;
padding: 0;
}.lowerbar li a {
width: 265px;
font-family: Georgia;
background: #3f3f3f;
border: 1px solid #111;
line-height: 1.4em;
-moz-border-radius: 5px;
padding: 0.5em;
margin-bottom: 11px;
margin-right: 3px;
-webkit-border-radius: 5px;
overflow: hidden;
color:#000000;
}.lowerbar li a:visited {
width: 265px;
font-family: Georgia;
background: #3f3f3f;
border: 1px solid #111;
line-height: 1.4em;
-moz-border-radius: 5px;
padding: 0.5em;
margin-bottom: 11px;
margin-right: 3px;
-webkit-border-radius: 5px;
overflow: hidden;
color:#000000;
}.lowerbar li a:hover {
background: #4f4f4f;
border: 1px solid #7a7a7a;
line-height: 1.4em;
-moz-border-radius: 5px;
padding: 0.5em; -webkit-border-radius: 5px;
overflow: hidden;
color:#000000;
}.lowerbar a {
font-family: Georgia;
background: #3f3f3f;
border: 1px solid #111;
line-height: 1.4em;
float:left;
-moz-border-radius: 5px;
padding: 0.5em;
margin-right: 3px;
margin-bottom: 11px;
-webkit-border-radius: 5px;
overflow: hidden;
color:#000000;
}.lowerbar a:hover {
background: #4f4f4f;
border: 1px solid #7a7a7a;
line-height: 1.4em;
-moz-border-radius: 5px;
padding: 0.5em; -webkit-border-radius: 5px;
overflow: hidden;
color:#000000;
}
Step 4:
Now search for </body> and paste following code just above </body>
<div id='lower'>
<div id='lower-wrapper'>
<div id='lowerbar-wrapper'>
<b:section class='lowerbar' id='lowerbar1' preferred='yes'>
<b:widget id='HTML12' locked='false' title='Testing' type='HTML'/>
</b:section>
</div>
<div id='lowerbar-wrapper'>
<b:section class='lowerbar' id='lowerbar2' preferred='yes'>
<b:widget id='Profile1' locked='false' title='About Me' type='Profile'/>
<b:widget id='HTML5' locked='false' title='Recent Comments' type='HTML'/>
</b:section>
</div>
<div id='lowerbar-wrapper'>
<b:section class='lowerbar' id='lowerbar3' preferred='yes'>
<b:widget id='HTML3' locked='false' title='Top Commentators @ AmmarWeb.Tk' type='HTML'/>
<b:widget id='HTML9' locked='false' title='Our Partners' type='HTML'/>
</b:section>
</div>

<div style='clear: both;'/></div></div>
Step 5:
Save your template .Now visit the page Layout > Page Elements and start adding widgets! :>>

Customization

You can easily customize the look and colours of the this footer widget. I have bolded the important parts in the CSS code above. Read the descriptions below carefully to better stylize your Three Column Footer Widget.
  • background:#333434; Changing the six digit colour code will change the background colour of this widget.
  • width: 960px; This is the width of the widget. If you want you can adjust this width value in accordance with the width of your blog.
  • background:#fff; and width: 32%; is the background colour and width of the three columns where the widgets are added.
  • color:#0084ce; This is the Colour of Title Headings
  • font: bold 14px Arial, Tahoma, Verdana; Edit this to change the font size and family.
  • border-bottom:3px solid #0084ce; Edit this to change the thickness, style and colour of the border that appears at the bottom of Title Heading
That’s All
A new tutorial on four column footer will be soon posted till than enjoy this one. Now Three Column Footer Widget is added!

Advertisement


Copyright 2008 All Rights Reserved Revolution Two Church theme by Brian Gardner Converted into Blogger Template by Bloganol dot com