Showing posts with label Template Designing. Show all posts

Wednesday, 13 November 2013

How To Add Border To Blog Header Using CSS

2 comments
 Add Border To Blog Header Using CSS:  Assalamualaikum Friends , after a long time i am back in Blogging , actually i was busy in 2nd Grade studies and now it's going to end !! Hope you all are fine , here is a small trick via which you can add border to your blog header with the help of CSS.Actually it's not a big or smart trick but some people are waiting desperately for this trick! If you are One of them here we go ! You will think how it will looks like? So , take a look on the below snapshot which has 24px cyan color border.And for live demo , take a look on our Blog header.

How To Add Border To Blog Header Using CSS

  • Go To Blogger Dashboard
  • Click On Template
  • EDIT HTML
  • Search For "header" and find out "#header-wrapper {" this CSS Code
  • Now below { and above } type border: style pixels color-name  as shown in the below snapshot
  •  Now Save the template and that's it :)
  • You Can Change the Style to dashed , dotted , groove or any style and pixels to your desired no and color to your desire choice!
So What's Up : Actually developers will laugh , but i know many People like this trick and they don't know what to Do and How To Do? But i am here for you guys , if you have any problem you can ask freely , i will help you in any problem . Stay Blessed , Happy Blogging!

Sunday, 13 October 2013

How To Change/Replace Widget's Title with image in Blogger

0 comments
Change/Replace Widget's Title with image in Blogger : Let's Do Something interesting ! Yep Interesting not much but interesting , today we will replace all widgets titles with an image . Isn't sounds good? Of Course yes.Actually One of our Blog readers ask this Question in Comments "How To Change/Replace Widget's Title with image in Blogger , as you did in your Blog".So I Promised him that I will share the trick with you People and here it is.

How To Change/Replace Widget's Title with image in Blogger

  • Go to Blogger Dashboard
  • Click On Template
  • EDIT HTML
  • CTRL+F and Search for the term "blockquote" in CSS section
  • Now Below Blockquote you will find the below CSS Code/script as shown in the below Snapshot
background: url("image url.png")
  
  • Just Replace that Mentioned Link with your Own Desired image Link
  • And That's it !!
  • For Live Demo You can have a look On my Blog Widgets Titles.
 Note : If background: url is not defined in the CSS You can do it manually just by typing the below script in the CSS as shown above.
background: url("imageurl.png")
So What's Up: Implement this trick if you got any Problem ask any Question freely , I am here to Solve your Problem ;) , Stay Blessed , Happy Blogging!

Sunday, 7 July 2013

How To Create Your Own Professional Blogger Template using Artisteer

0 comments
Earth without "Art" is just "Eh".Likewise Blogging without a Professional Template is just Eh.Actually Blogger has an impressive template designer which enable a person to easily customize the theme of Blog.These modifications contains the changing of Background,Fonts,Colors,width etc but actually this designer will not allow to change the whole appearance of Blogger Template without having the knowledge of CSS or HTML.In this regards most of People hire expert programmers to design a Professional Template for Them.And hiring an expert is not without of cost , they have to pay a huge amount of money.Now to get rid of this shit we are here to present you an ideal Software which will enable you to design a Professional Blogger Template without having the knowledge of programming.

What is Artisteer?

  1. Artisteer is an automotive web design software that allow us to design a stunning and impressive Blogger Templates.
  2. A Friendly Software; You Can Create web pages just by drag and drop Options
  3. You Can edit an existing template or can create your Own Professional Template with the help of Artisteer.
  4. Artisteer will not force you to learn CSS,HTML or any other Programming Language because it is So Friendly and easy to use.

How To Create Your Own Professional Blogger Template using Artisteer

First Of All Download The Artisteer Tool,When You Download the tool install it.The installation of this Software is too much easy,it is as simple as installing a common software,Once installation is Done Open the Software.After Opening the Artisteer follow the below steps for creating Blogger Template
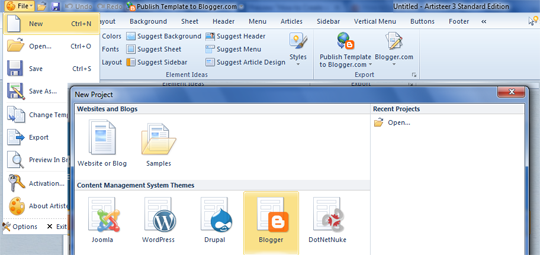
  • Click On File and then click on new
  • A Window will pop-up,and will ask you for selecting a CMS (Content management system).It supports four most popular CMS systems i.e. Blogger, Drupal, WordPress, DukeNetNuke and Joomla.Now here we will create Blogger Template,So Select Blogger,then Proceed to the next step.
designing-blogger-template

Designing The Header

  • Actually header is the main thing in Blogger template which makes a template impressive and stunning,So Creating Header is lil bit hard work.
  • Take a look On tool bar and Click On Header as shown in the Screenshot below


  • Clicking Header will Provide you many Option such as Changing the Width,Height,Background,Styles etc of Header.You Can add animated gif images in header via this Tool.You Can also add different colors to header via this tool

Designing Side-bar

  • Side-bar:- The 2nd main thing which makes a Template awesome is side-bar,side-bar can be left side-bar or right sidebar.By Clicking Sidebar from Toolbar You will get a list of Option for changing the appearance of side-bar and also to give different styles to sidebar.
  • If you are interested in adding two side-bars to your template,just click On layout Option which will provide you a couple of options such as selecting One Column,or two columns or three columns.You can select it accordingly.


Designing Main Elements of Template

Layout :- With The Help of Artisteer you can create a beautiful layout for your template,You Can add different borders,text and other impressive stuff to your template outlook!

Background :- This option allows you to upload a unique picture,which will be placed instead of background image in your Template.You Can add your Desire image in place of Background image.

Footer:- From The Tool Bar you can select Footer Option which enables you to create a unique footer ,i.e how much columns you want to create your Blog Footer,implementing different Fonts to Footer Text etc.

Template Ready ? Time To Export!

When Template is ready,now time to export it and upload to a Blog.For Exporting the templaet follow these steps
  • Go To File Menu
  • Click On Export
  • Export Template
  • Now Save the file to a directory
  • The File will  be saved in .zip Extension 
  • Now You have to extract the files from RAR File
  • It usually contains two Files 1) Template .xml File 2) and Folder for images
  • That's it !
  • HappY Blogging!
How To Create Your Own Professional Blogger Template using Artisteer
Last Reviewed by Iftikhar uddin on July 07 2013
Rating: 4.5

Advertisement


Copyright 2008 All Rights Reserved Revolution Two Church theme by Brian Gardner Converted into Blogger Template by Bloganol dot com