Showing posts with label HowTo Tuts. Show all posts

Wednesday, 13 November 2013

How To Add Border To Blog Header Using CSS

2 comments
 Add Border To Blog Header Using CSS:  Assalamualaikum Friends , after a long time i am back in Blogging , actually i was busy in 2nd Grade studies and now it's going to end !! Hope you all are fine , here is a small trick via which you can add border to your blog header with the help of CSS.Actually it's not a big or smart trick but some people are waiting desperately for this trick! If you are One of them here we go ! You will think how it will looks like? So , take a look on the below snapshot which has 24px cyan color border.And for live demo , take a look on our Blog header.

How To Add Border To Blog Header Using CSS

  • Go To Blogger Dashboard
  • Click On Template
  • EDIT HTML
  • Search For "header" and find out "#header-wrapper {" this CSS Code
  • Now below { and above } type border: style pixels color-name  as shown in the below snapshot
  •  Now Save the template and that's it :)
  • You Can Change the Style to dashed , dotted , groove or any style and pixels to your desired no and color to your desire choice!
So What's Up : Actually developers will laugh , but i know many People like this trick and they don't know what to Do and How To Do? But i am here for you guys , if you have any problem you can ask freely , i will help you in any problem . Stay Blessed , Happy Blogging!

Saturday, 19 October 2013

How To Add Automatic "Read More" Button/Hack in Blogger

0 comments
Add Automatic Read More Button in Blogger: Although it's not a Big Deal that How To Add Read More Button in Blogger but some new bloggers can't fix this Problem and they are randomly searching for this hack. Let me elaborate it for you People , this is not as hard as "mesothelioma trial attorney " this word .This Hack just add "read more" option in every post. Actually you may have seen in some Blogger Templates that when you post some contents , it just show the whole contents i.e article from Start to the end but this Hack will wind up the article and will not show the whole article but read more button will be present there.So let's add this read more button in blogger.

How To Add Automatic "Read More" Button/Hack in Blogger

  • Go To Blogger Dashboard
  • EDIT HTML
  • Now Press CTRL+F and Search for </head>
  • Now Copy the below Script and paste it above </head> tag.
 <script type='text/javascript'>var thumbnail_mode = &quot;no-float&quot; ;
summary_noimg = 500;
summary_img = 450;
img_thumb_height = 100;
img_thumb_width = 120;
</script>
<script src='http://files.main.bloggerstop.net/uploads/3/0/2/5/3025338/read-more_auto2.js' type='text/javascript'/>
  • You can change the number in red to your desire number. If a post doesn't have images then the length of the summary will be surely 500. If a post contains image, then of course the text length will be 450, And the 1st image that will be displayed will have these dimensions: width= 120, and height= 100.
  • Now Search for <data:post.body/>
  • Now Copy the Below Script and replace the above mentioned script with the below Script
<b:if cond='data:blog.pageType == "item"'>
<data:post.body/><b:else/>
<b:if cond='data:blog.pageType == "static_page"'>
<data:post.body/><b:else/>
<div expr:id='"summary" + data:post.id'>
<data:post.body/>
</div><script type='text/javascript'>
createSummaryAndThumb("summary<data:post.id/>");</script>
<div style='clear: both;'/>
<span class='rmlink' style='float:right;padding-top:20px;'><a expr:href='data:post.url'> Read More... <data:post.title/> </a></span></b:if></b:if>
  • Now Save template and that's it ;)

Sunday, 13 October 2013

How To Change/Replace Widget's Title with image in Blogger

0 comments
Change/Replace Widget's Title with image in Blogger : Let's Do Something interesting ! Yep Interesting not much but interesting , today we will replace all widgets titles with an image . Isn't sounds good? Of Course yes.Actually One of our Blog readers ask this Question in Comments "How To Change/Replace Widget's Title with image in Blogger , as you did in your Blog".So I Promised him that I will share the trick with you People and here it is.

How To Change/Replace Widget's Title with image in Blogger

  • Go to Blogger Dashboard
  • Click On Template
  • EDIT HTML
  • CTRL+F and Search for the term "blockquote" in CSS section
  • Now Below Blockquote you will find the below CSS Code/script as shown in the below Snapshot
background: url("image url.png")
  
  • Just Replace that Mentioned Link with your Own Desired image Link
  • And That's it !!
  • For Live Demo You can have a look On my Blog Widgets Titles.
 Note : If background: url is not defined in the CSS You can do it manually just by typing the below script in the CSS as shown above.
background: url("imageurl.png")
So What's Up: Implement this trick if you got any Problem ask any Question freely , I am here to Solve your Problem ;) , Stay Blessed , Happy Blogging!

Friday, 11 October 2013

Add Cool Drop Down Menu in Blogger

0 comments
Drop Down Navigation Menu For Blogger : You may have seen many drop-down menus but today "ThatsBlogging" will present you an incredible Drop Down menu , which is really a magnificent drop down menu.Actually it is developed by the combination of CSS with HTML . Beautiful Colors combinations are used which makes it more significant drop down menu.Actually , drop down menu makes your blog navigative and easy to expand.This drop down menu is very stylish which means your Blog Beauty will increase by adding this menu.Moreover this menu will not slow your blog loading speed.

How To Add Cool Drop Down Menu in Blogger

  • Go To Blogger Dashboard
  • Click On Template
  • Edit HTML
  • Search For </header>
  • Copy the Below Script and Add it below the Closing Header tag ( </header>)
<div id='menubor'></div><center><ul id='menu'>
<li><a class='hmlink' href='#'>Home</a></li>
<li><a class='winlink' href='#'>Blogger Templates</a></li>
<li><a class='maclink' href='#'>Blogger Widgets</a></li>
<li><a class='andlink' href='#'>How To Tuts</a></li>
<li><a class='gamlink' href='#'>Privacy Policy</a></li>
<li><a class='seclink' href='#'>Guest Post</a></li>
<li><a class='linlink' href='#'>About</a></li>
</ul></center>
<style>
#menu li {
display: inline;
list-style: none;
padding: 0;
}

#menu li a {
padding: 15px 20px 15px 20px;
text-decoration: none;
color:white;
font-family: 'Noto Serif', serif;
-moz-box-shadow: inset 0 0 13px -2px #000;
-webkit-box-shadow: inset 0 0 13px -2px #000;
box-shadow: inset 0 0 13px -2px #000;
font-size:18px;
-webkit-border-bottom-right-radius: 10px;
-webkit-border-bottom-left-radius: 10px;
-moz-border-radius-bottomright: 10px;
-moz-border-radius-bottomleft: 10px;
border-bottom-right-radius: 10px;
border-bottom-left-radius: 10px;
transition: padding-bottom .666s;
-webkit-transition: padding-bottom .666s;
-moz-transition: padding-bottom .666s;
-o-transition: padding-bottom .666s;
-ms-transition: padding-bottom .666s;


}
#menu li a:hover {

padding-bottom:20px;
}
.hmlink{
background:#24459A;
}
.winlink{
background-color: rgba(9,173,217,1);
}
.maclink{
background-color: rgba(108,109,112,1);
}
.weblink{
background:#EEEE00;
color:black;
}
.andlink{
background-color: rgba(149,191,43,1);
}
.gamlink{
background-color: rgba(212,2,43,1);
}
.seclink{
background-color: rgba(0,158,62,1);
}
.linlink{
background-color: rgb(123, 82, 138);
}
#menubor{
border-top:1px solid black;
margin-bottom:-1px;
}
.header-outer{
padding-bottom:20px;
}
</style>

Changes

  • For Changing the Links Replace # with your Own Links and the Anchor text with your desired text
  • That's it , Save Your template and have fun !
  • If you are interested in adding extra <li> options for that add  <li><a class='desiredword' href='#'>text</a></li> between <ul> and </ul> tags.
  • After implementing the above step ,  you have to define the class in CSS for that define the class between the style container and hit save.
  • If you have any Question ask it freely !! Stay Blessed , Happy Blogging !

Saturday, 7 September 2013

How To Add Animated Buttons in Blogger

0 comments
Animated Buttons For Blogger : Let's Do Something interesting , today we are going to share some beautiful style buttons which can be easily made by using CSS.Actually these buttons makes your "download links" attractive and stylish.For adding these buttons you have to add a Script in template HTML , so first backup your Blog Template and then implement this hack !

How To Add Animated Buttons in Blogger

  • Go To Blogger
  • Click On Template
  • Edit HTML
  • Search For  ]]></b:skin> 
  • Copy the Below CSS Script and paste it above  ]]></b:skin>
CSS Script
.button {display: inline-block;position: relative;padding: 10px 20px;-webkit-border-radius: 8px;-moz-border-radius: 8px;border-radius: 8px;text-decoration: none!important;text-shadow: 1px 1px 0 rgba(255,255,255,0.4);font: 15px Calibri,Arial,sans-serif;white-space: nowrap;vertical-align: baseline;background-image: url('https://blogger.googleusercontent.com/img/b/R29vZ2xl/AVvXsEiG5YW6fSSZknCR7W6D6vZBNkoULKIYAW2sUbEYjUNCPOsGsKolewVLy6m2niap0QIQN0Z03zE4qLgaICqOw-7jX1llm48lY6yUBW8bnaqmkPtbvrhUczJ-9GBEH4J_x8sY0n4z6moixI5a/s144/button_bg.png');background-position: bottom left;background-position: bottom left,top right,0 0,0 0;background-repeat: no-repeat;background-clip: border-box;-webkit-box-shadow: 0 0 1px #fff inset;-moz-box-shadow: 0 0 1px #fff inset;box-shadow: 0 0 1px #fff inset;-webkit-transition: background-position 1s;-moz-transition: background-position 1s;transition: background-position 1s;cursor: pointer;}
.button:hover {background-position: top left;background-position: top left,bottom right,0 0,0 0;}
.button:active {bottom: -1px;}
.button.big {font-size: 30px;}
.button.medium {font-size: 18px;}
.button.small {font-size: 13px;}
.blue.button {border: 1px solid #84acc3!important;color: #0f4b6d!important;background-color: #48b5f2;background-image: url('https://blogger.googleusercontent.com/img/b/R29vZ2xl/AVvXsEiG5YW6fSSZknCR7W6D6vZBNkoULKIYAW2sUbEYjUNCPOsGsKolewVLy6m2niap0QIQN0Z03zE4qLgaICqOw-7jX1llm48lY6yUBW8bnaqmkPtbvrhUczJ-9GBEH4J_x8sY0n4z6moixI5a/s144/button_bg.png'), url('https://blogger.googleusercontent.com/img/b/R29vZ2xl/AVvXsEiG5YW6fSSZknCR7W6D6vZBNkoULKIYAW2sUbEYjUNCPOsGsKolewVLy6m2niap0QIQN0Z03zE4qLgaICqOw-7jX1llm48lY6yUBW8bnaqmkPtbvrhUczJ-9GBEH4J_x8sY0n4z6moixI5a/s144/button_bg.png') ,-moz-radial-gradient(center bottom,circle,rgba(89,208,244,1) 0,rgba(89,208,244,0) 100px),-moz-linear-gradient(#4fbbf7,#3faeeb);background-image: url('https://blogger.googleusercontent.com/img/b/R29vZ2xl/AVvXsEiG5YW6fSSZknCR7W6D6vZBNkoULKIYAW2sUbEYjUNCPOsGsKolewVLy6m2niap0QIQN0Z03zE4qLgaICqOw-7jX1llm48lY6yUBW8bnaqmkPtbvrhUczJ-9GBEH4J_x8sY0n4z6moixI5a/s144/button_bg.png'), url('https://blogger.googleusercontent.com/img/b/R29vZ2xl/AVvXsEiG5YW6fSSZknCR7W6D6vZBNkoULKIYAW2sUbEYjUNCPOsGsKolewVLy6m2niap0QIQN0Z03zE4qLgaICqOw-7jX1llm48lY6yUBW8bnaqmkPtbvrhUczJ-9GBEH4J_x8sY0n4z6moixI5a/s144/button_bg.png') ,-webkit-gradient(radial,50% 100%,0,50% 100%,100,from(rgba(89,208,244,1) ),to(rgba(89,208,244,0) )),-webkit-gradient(linear,0% 0,0% 100%,from(#4fbbf7),to(#3faeeb));}
.blue.button:hover {background-color: #63c7fe;background-image: url('https://blogger.googleusercontent.com/img/b/R29vZ2xl/AVvXsEiG5YW6fSSZknCR7W6D6vZBNkoULKIYAW2sUbEYjUNCPOsGsKolewVLy6m2niap0QIQN0Z03zE4qLgaICqOw-7jX1llm48lY6yUBW8bnaqmkPtbvrhUczJ-9GBEH4J_x8sY0n4z6moixI5a/s144/button_bg.png'), url('https://blogger.googleusercontent.com/img/b/R29vZ2xl/AVvXsEiG5YW6fSSZknCR7W6D6vZBNkoULKIYAW2sUbEYjUNCPOsGsKolewVLy6m2niap0QIQN0Z03zE4qLgaICqOw-7jX1llm48lY6yUBW8bnaqmkPtbvrhUczJ-9GBEH4J_x8sY0n4z6moixI5a/s144/button_bg.png') ,-moz-radial-gradient(center bottom,circle,rgba(109,217,250,1) 0,rgba(109,217,250,0) 100px),-moz-linear-gradient(#63c7fe,#58bef7);background-image: url('https://blogger.googleusercontent.com/img/b/R29vZ2xl/AVvXsEiG5YW6fSSZknCR7W6D6vZBNkoULKIYAW2sUbEYjUNCPOsGsKolewVLy6m2niap0QIQN0Z03zE4qLgaICqOw-7jX1llm48lY6yUBW8bnaqmkPtbvrhUczJ-9GBEH4J_x8sY0n4z6moixI5a/s144/button_bg.png'), url('https://blogger.googleusercontent.com/img/b/R29vZ2xl/AVvXsEiG5YW6fSSZknCR7W6D6vZBNkoULKIYAW2sUbEYjUNCPOsGsKolewVLy6m2niap0QIQN0Z03zE4qLgaICqOw-7jX1llm48lY6yUBW8bnaqmkPtbvrhUczJ-9GBEH4J_x8sY0n4z6moixI5a/s144/button_bg.png') ,-webkit-gradient(radial,50% 100%,0,50% 100%,100,from(rgba(109,217,250,1) ),to(rgba(109,217,250,0) )),-webkit-gradient(linear,0% 0,0% 100%,from(#63c7fe),to(#58bef7));}
.green.button {border: 1px solid #96a37b!important;color: #345903!important;background-color: #79be1e;background-image: url('https://blogger.googleusercontent.com/img/b/R29vZ2xl/AVvXsEiG5YW6fSSZknCR7W6D6vZBNkoULKIYAW2sUbEYjUNCPOsGsKolewVLy6m2niap0QIQN0Z03zE4qLgaICqOw-7jX1llm48lY6yUBW8bnaqmkPtbvrhUczJ-9GBEH4J_x8sY0n4z6moixI5a/s144/button_bg.png'), url('https://blogger.googleusercontent.com/img/b/R29vZ2xl/AVvXsEiG5YW6fSSZknCR7W6D6vZBNkoULKIYAW2sUbEYjUNCPOsGsKolewVLy6m2niap0QIQN0Z03zE4qLgaICqOw-7jX1llm48lY6yUBW8bnaqmkPtbvrhUczJ-9GBEH4J_x8sY0n4z6moixI5a/s144/button_bg.png') ,-moz-radial-gradient(center bottom,circle,rgba(162,211,30,1) 0,rgba(162,211,30,0) 100px),-moz-linear-gradient(#82cc27,#74b317);background-image: url('https://blogger.googleusercontent.com/img/b/R29vZ2xl/AVvXsEiG5YW6fSSZknCR7W6D6vZBNkoULKIYAW2sUbEYjUNCPOsGsKolewVLy6m2niap0QIQN0Z03zE4qLgaICqOw-7jX1llm48lY6yUBW8bnaqmkPtbvrhUczJ-9GBEH4J_x8sY0n4z6moixI5a/s144/button_bg.png'), url('https://blogger.googleusercontent.com/img/b/R29vZ2xl/AVvXsEiG5YW6fSSZknCR7W6D6vZBNkoULKIYAW2sUbEYjUNCPOsGsKolewVLy6m2niap0QIQN0Z03zE4qLgaICqOw-7jX1llm48lY6yUBW8bnaqmkPtbvrhUczJ-9GBEH4J_x8sY0n4z6moixI5a/s144/button_bg.png') ,-webkit-gradient(radial,50% 100%,0,50% 100%,100,from(rgba(162,211,30,1) ),to(rgba(162,211,30,0) )),-webkit-gradient(linear,0% 0,0% 100%,from(#82cc27),to(#74b317));}
.green.button:hover {background-color: #89d228;background-image: url('https://blogger.googleusercontent.com/img/b/R29vZ2xl/AVvXsEiG5YW6fSSZknCR7W6D6vZBNkoULKIYAW2sUbEYjUNCPOsGsKolewVLy6m2niap0QIQN0Z03zE4qLgaICqOw-7jX1llm48lY6yUBW8bnaqmkPtbvrhUczJ-9GBEH4J_x8sY0n4z6moixI5a/s144/button_bg.png'), url('https://blogger.googleusercontent.com/img/b/R29vZ2xl/AVvXsEiG5YW6fSSZknCR7W6D6vZBNkoULKIYAW2sUbEYjUNCPOsGsKolewVLy6m2niap0QIQN0Z03zE4qLgaICqOw-7jX1llm48lY6yUBW8bnaqmkPtbvrhUczJ-9GBEH4J_x8sY0n4z6moixI5a/s144/button_bg.png') ,-moz-radial-gradient(center bottom,circle,rgba(183,229,45,1) 0,rgba(183,229,45,0) 100px),-moz-linear-gradient(#90de31,#7fc01e);background-image: url('https://blogger.googleusercontent.com/img/b/R29vZ2xl/AVvXsEiG5YW6fSSZknCR7W6D6vZBNkoULKIYAW2sUbEYjUNCPOsGsKolewVLy6m2niap0QIQN0Z03zE4qLgaICqOw-7jX1llm48lY6yUBW8bnaqmkPtbvrhUczJ-9GBEH4J_x8sY0n4z6moixI5a/s144/button_bg.png'), url('https://blogger.googleusercontent.com/img/b/R29vZ2xl/AVvXsEiG5YW6fSSZknCR7W6D6vZBNkoULKIYAW2sUbEYjUNCPOsGsKolewVLy6m2niap0QIQN0Z03zE4qLgaICqOw-7jX1llm48lY6yUBW8bnaqmkPtbvrhUczJ-9GBEH4J_x8sY0n4z6moixI5a/s144/button_bg.png') ,-webkit-gradient(radial,50% 100%,0,50% 100%,100,from(rgba(183,229,45,1) ),to(rgba(183,229,45,0) )),-webkit-gradient(linear,0% 0,0% 100%,from(#90de31),to(#7fc01e));}
.orange.button {border: 1px solid #bea280!important;color: #693e0a!important;background-color: #e38d27;background-image: url('https://blogger.googleusercontent.com/img/b/R29vZ2xl/AVvXsEiG5YW6fSSZknCR7W6D6vZBNkoULKIYAW2sUbEYjUNCPOsGsKolewVLy6m2niap0QIQN0Z03zE4qLgaICqOw-7jX1llm48lY6yUBW8bnaqmkPtbvrhUczJ-9GBEH4J_x8sY0n4z6moixI5a/s144/button_bg.png'), url('https://blogger.googleusercontent.com/img/b/R29vZ2xl/AVvXsEiG5YW6fSSZknCR7W6D6vZBNkoULKIYAW2sUbEYjUNCPOsGsKolewVLy6m2niap0QIQN0Z03zE4qLgaICqOw-7jX1llm48lY6yUBW8bnaqmkPtbvrhUczJ-9GBEH4J_x8sY0n4z6moixI5a/s144/button_bg.png') ,-moz-radial-gradient(center bottom,circle,rgba(232,189,45,1) 0,rgba(232,189,45,0) 100px),-moz-linear-gradient(#f1982f,#d4821f);background-image: url('https://blogger.googleusercontent.com/img/b/R29vZ2xl/AVvXsEiG5YW6fSSZknCR7W6D6vZBNkoULKIYAW2sUbEYjUNCPOsGsKolewVLy6m2niap0QIQN0Z03zE4qLgaICqOw-7jX1llm48lY6yUBW8bnaqmkPtbvrhUczJ-9GBEH4J_x8sY0n4z6moixI5a/s144/button_bg.png'), url('https://blogger.googleusercontent.com/img/b/R29vZ2xl/AVvXsEiG5YW6fSSZknCR7W6D6vZBNkoULKIYAW2sUbEYjUNCPOsGsKolewVLy6m2niap0QIQN0Z03zE4qLgaICqOw-7jX1llm48lY6yUBW8bnaqmkPtbvrhUczJ-9GBEH4J_x8sY0n4z6moixI5a/s144/button_bg.png') ,-webkit-gradient(radial,50% 100%,0,50% 100%,100,from(rgba(232,189,45,1) ),to(rgba(232,189,45,0) )),-webkit-gradient(linear,0% 0,0% 100%,from(#f1982f),to(#d4821f));}
.orange.button:hover {background-color: #ec9732;background-image: url('https://blogger.googleusercontent.com/img/b/R29vZ2xl/AVvXsEiG5YW6fSSZknCR7W6D6vZBNkoULKIYAW2sUbEYjUNCPOsGsKolewVLy6m2niap0QIQN0Z03zE4qLgaICqOw-7jX1llm48lY6yUBW8bnaqmkPtbvrhUczJ-9GBEH4J_x8sY0n4z6moixI5a/s144/button_bg.png'), url('https://blogger.googleusercontent.com/img/b/R29vZ2xl/AVvXsEiG5YW6fSSZknCR7W6D6vZBNkoULKIYAW2sUbEYjUNCPOsGsKolewVLy6m2niap0QIQN0Z03zE4qLgaICqOw-7jX1llm48lY6yUBW8bnaqmkPtbvrhUczJ-9GBEH4J_x8sY0n4z6moixI5a/s144/button_bg.png') ,-moz-radial-gradient(center bottom,circle,rgba(241,192,52,1) 0,rgba(241,192,52,0) 100px),-moz-linear-gradient(#f9a746,#e18f2b);background-image: url('https://blogger.googleusercontent.com/img/b/R29vZ2xl/AVvXsEiG5YW6fSSZknCR7W6D6vZBNkoULKIYAW2sUbEYjUNCPOsGsKolewVLy6m2niap0QIQN0Z03zE4qLgaICqOw-7jX1llm48lY6yUBW8bnaqmkPtbvrhUczJ-9GBEH4J_x8sY0n4z6moixI5a/s144/button_bg.png'), url('https://blogger.googleusercontent.com/img/b/R29vZ2xl/AVvXsEiG5YW6fSSZknCR7W6D6vZBNkoULKIYAW2sUbEYjUNCPOsGsKolewVLy6m2niap0QIQN0Z03zE4qLgaICqOw-7jX1llm48lY6yUBW8bnaqmkPtbvrhUczJ-9GBEH4J_x8sY0n4z6moixI5a/s144/button_bg.png') ,-webkit-gradient(radial,50% 100%,0,50% 100%,100,from(rgba(241,192,52,1) ),to(rgba(241,192,52,0) )),-webkit-gradient(linear,0% 0,0% 100%,from(#f9a746),to(#e18f2b));}
.gray.button {border: 1px solid #a5a5a5!important;color: #525252!important;background-color: #a9adb1;background-image: url('https://blogger.googleusercontent.com/img/b/R29vZ2xl/AVvXsEiG5YW6fSSZknCR7W6D6vZBNkoULKIYAW2sUbEYjUNCPOsGsKolewVLy6m2niap0QIQN0Z03zE4qLgaICqOw-7jX1llm48lY6yUBW8bnaqmkPtbvrhUczJ-9GBEH4J_x8sY0n4z6moixI5a/s144/button_bg.png'), url('https://blogger.googleusercontent.com/img/b/R29vZ2xl/AVvXsEiG5YW6fSSZknCR7W6D6vZBNkoULKIYAW2sUbEYjUNCPOsGsKolewVLy6m2niap0QIQN0Z03zE4qLgaICqOw-7jX1llm48lY6yUBW8bnaqmkPtbvrhUczJ-9GBEH4J_x8sY0n4z6moixI5a/s144/button_bg.png') ,-moz-radial-gradient(center bottom,circle,rgba(197,199,202,1) 0,rgba(197,199,202,0) 100px),-moz-linear-gradient(#c5c7ca,#92989c);background-image: url('https://blogger.googleusercontent.com/img/b/R29vZ2xl/AVvXsEiG5YW6fSSZknCR7W6D6vZBNkoULKIYAW2sUbEYjUNCPOsGsKolewVLy6m2niap0QIQN0Z03zE4qLgaICqOw-7jX1llm48lY6yUBW8bnaqmkPtbvrhUczJ-9GBEH4J_x8sY0n4z6moixI5a/s144/button_bg.png'), url('https://blogger.googleusercontent.com/img/b/R29vZ2xl/AVvXsEiG5YW6fSSZknCR7W6D6vZBNkoULKIYAW2sUbEYjUNCPOsGsKolewVLy6m2niap0QIQN0Z03zE4qLgaICqOw-7jX1llm48lY6yUBW8bnaqmkPtbvrhUczJ-9GBEH4J_x8sY0n4z6moixI5a/s144/button_bg.png') ,-webkit-gradient(radial,50% 100%,0,50% 100%,100,from(rgba(197,199,202,1) ),to(rgba(197,199,202,0) )),-webkit-gradient(linear,0% 0,0% 100%,from(#c5c7ca),to(#92989c));}
.gray.button:hover {background-color: #b6bbc0;background-image: url('https://blogger.googleusercontent.com/img/b/R29vZ2xl/AVvXsEiG5YW6fSSZknCR7W6D6vZBNkoULKIYAW2sUbEYjUNCPOsGsKolewVLy6m2niap0QIQN0Z03zE4qLgaICqOw-7jX1llm48lY6yUBW8bnaqmkPtbvrhUczJ-9GBEH4J_x8sY0n4z6moixI5a/s144/button_bg.png'), url('https://blogger.googleusercontent.com/img/b/R29vZ2xl/AVvXsEiG5YW6fSSZknCR7W6D6vZBNkoULKIYAW2sUbEYjUNCPOsGsKolewVLy6m2niap0QIQN0Z03zE4qLgaICqOw-7jX1llm48lY6yUBW8bnaqmkPtbvrhUczJ-9GBEH4J_x8sY0n4z6moixI5a/s144/button_bg.png') ,-moz-radial-gradient(center bottom,circle,rgba(202,205,208,1) 0,rgba(202,205,208,0) 100px),-moz-linear-gradient(#d1d3d6,#9fa5a9);background-image: url('https://blogger.googleusercontent.com/img/b/R29vZ2xl/AVvXsEiG5YW6fSSZknCR7W6D6vZBNkoULKIYAW2sUbEYjUNCPOsGsKolewVLy6m2niap0QIQN0Z03zE4qLgaICqOw-7jX1llm48lY6yUBW8bnaqmkPtbvrhUczJ-9GBEH4J_x8sY0n4z6moixI5a/s144/button_bg.png'), url('https://blogger.googleusercontent.com/img/b/R29vZ2xl/AVvXsEiG5YW6fSSZknCR7W6D6vZBNkoULKIYAW2sUbEYjUNCPOsGsKolewVLy6m2niap0QIQN0Z03zE4qLgaICqOw-7jX1llm48lY6yUBW8bnaqmkPtbvrhUczJ-9GBEH4J_x8sY0n4z6moixI5a/s144/button_bg.png') ,-webkit-gradient(radial,50% 100%,0,50% 100%,100,from(rgba(202,205,208,1) ),to(rgba(202,205,208,0) )),-webkit-gradient(linear,0% 0,0% 100%,from(#d1d3d6),to(#9fa5a9));}
  • After adding this CSS Script Save the template!
  • Now Add any of the below HTML Code/Script in Post where you want to appear the Buttons.

 HTML For Large Size Buttons

<a class="button big blue" href="#">text</a>
<a class="button big green" href="#">text</a>
<a class="button big orange" href="#">text</a>
<a class="button big gray" href="#">Text</a> 

HTML For Media Size buttons

<a class="button medium blue" href="#">text</a>
<a class="button medium green" href="#">text</a>
<a class="button medium orange" href="#">text</a>
<a class="button medium gray" href="#">Text</a>
Customization : Replace # in the script(HTML) with the URL and Text with the Anchor Text .

So What's Up : Adding these Bubble Buttons makes your post more attractive and Cool.So if You Can why not implement it?Stay Blessed , Happy Blogging!

Tuesday, 3 September 2013

How To Create Table Of Contents in Blogger

0 comments
Create Table Of Contents in Blogger : By Creating Table of Contents in your Blog will help you to arrange your Blog Contents category wise.This Widget is specially designed for blogs which contains alot of categories , this widget will enable them to place all the categories along-with the specific posts in a page called "Table of Contents".The most interesting fact about this widget is that it will help the readers to inform that which post is "New" and which is "Old" . The word New will dance with latest posts and Old will be with Old Posts.

How To Create Table Of Contents in Blogger

  • Get into Blogger Dashboard
  • Click On Pages
  • Create a Static Page
  • Click On HTML of the Page
  • Copy the below script and paste it into the Page HTML
 <script src="//sites.google.com/site/blogger9dotnet/color-css/blogger9.js"></script>
<script src="/feeds/posts/summary?alt=json-in-script&amp;max-results=1000&amp;callback=loadtoc" type="text/javascript"></script>
  • Name the Page "Table Of Contents" or any thing else
  • Hit Publish and that's it!
So What's Up : This widget just arrange all the Blog Contents in a social way.And it helps the readers to navigate old and new posts.Stay Blessed ,Happy Blogging!

Wednesday, 28 August 2013

How To Speedup utorrent Speed from 2KBPS to 4MBPS

0 comments
utorrentSpeedup µTorrent Speed from 2KBPS to 4MBPS: µTorrent is the ever best software for downloading movies,softwares , games and extra stuff ! Actually µTorrent was developed by BitTorrent Inc, and firstly it was released in September 18, 2005.According to sources it is available in 67 languages.µTorrent is available for Microsoft Windows, Mac OS X, Linux, and Android! Moreover it is written in C++, oh we are going some where else , it was just a lil bit info about µTorrent.Actually if you download µTorrent and start downloading some stuff , it has very slow downloading speed .But Today we will share an awesome trick which will help you to Speedup µTorrent Speed from 2KBPS to 4 MBPS.Now If you are interested in Learning "How To Speedup Utorrent Speed from 2KBPS to 4MBPS" .Watch the Video tutorial below.

Features Of UTorrent

  • Streaming of video torrents
  • Resume Capability :  It's Pakistan , Yeah Every hour Light gets off , But Don't worry µTorrent is the software which has awesome resume capability , It will automatically resume your Download when you on your PC.
  • It Supports Teredo tunneling / IPv6 !
  • Embedded Tracker
  • HTTPS Tracker Support 
  • Available in 67 Languages
  • Size is 1.5 Mega Byte 
  • Full proxy server support
  • And many Awesome Features
 You may Also like : Create Your OWN Facebook Timeline Covers

    Download Utorrent

    Video Tutorial

    How To Add Comment Counter to Post Header Titles in Blogger

    0 comments
    Add Comment Counter to Post Header Titles in Blogger: By Default numbers of Comments is shown below the each post in Comment Section.As it is placed below post , so most of us never noticed it.Now If you are interested in adding this Comment Counter to Header it will really inspire your blog readers and will socially force them to comment.It's a fact , if you add Comment Counter near to Blog post Title it will be totally better then the below area.And it will surely inspire your Blog Readers to Comment on your Posts.What Do You Think this Counter is better neat to Post Titles? If Yes, Then follow the following steps.

    How To Add Comment Counter to Post Header Titles in Blogger
    You May Also Like This : Add Divider Between Posts in Blogger

    How To Add Comment Counter to Post Header Titles in Blogger

      • Go To Blogger
      • Click On Template
      • EDIT HTML
      • Search for ]]></b:skin>
      • Now Copy the Below Script and add it just above ]]></b:skin>
      .comment-count {
      float : right;
      width : 47px;
      height : 47px;
      background : url(  SPECIFIC IMAGE URL  );
      background-repeat: no-repeat;
      font-size : 19px;
      position:absolute;
      margin-top : -16px;
      margin-right : 2px;
      text-align : center;
      }
      • Now Chose the Comment Counter Background

      • Now Copy the Image URL and Replace SPECIFIC IMAGE URL in the script with the image URL
      • Now Add Comment Count Code 
      • For That Again Go To Blogger Dashboard >> Template >> Edit HTML >> Search For
        <h2 class='post-title entry-title' itemprop='name'> OR class='post-title entry-title'
         
      • Now Copy the Below Script and add it below the Above mentioned Code
      <b:if cond='data:post.allowComments'>
      <a class='comment-count' expr:href='data:post.addCommentUrl' expr:onclick='data:post.addCommentOnclick'><data:post.numComments/></a>
      </b:if> 
      • Now Save Template and That's it !
       So What's Up : If You Liked this tut , Please Share it and Express your views in Comments . Stay Blessed ,Happy Blogging!

    Thursday, 22 August 2013

    How To Put a Widget inside a Scroll Box

    0 comments
    Maybe you have noticed in several blogs/websites that they have alot of widgets which have just ruined there blog style and space.Now to get rid of these long widgets , you can put them in a Box having a Scroll bar.Any tall widget like Blog Archive etc widgets must be placed in a Scroll box.
    This will save your Blog Space and will make your blog easy and navigative for readers.Implementing this Widget will enables you to place your widget content in a Scroll box , so your readers can easily navigate blog contents.In this Scroll box , all titles will be static and can easily be accessed by your Readers.
     

    How To Put a Widget inside a Scroll Box

    • Find the Widget ID You want to place it in a Scroll box
    • Visit Blogger Dashboard.
      • Click On Template
      • Edit HTML
      • Search for this Code
      ]]></b:skin>
      • Now Copy the below Script and add 
        it above this Script ]]></b:skin>
      /* By thatsBlogging.blogspot.com START */
      #WidgetIdYouWant2PlaceinScrollBox .widget-content {
      height: 200px;
      overflow: auto;
      }
      /* END */  
      • Replace WidgetIdYouWant2PlaceinScrollBox  
        with Widget ID >>Save Template and that's it!

        So What's Up : If You have Any Question regarding this Tut ,
        ask freely we are here to reply! Stay Blessed ,Happy Blogging!

    Wednesday, 21 August 2013

    Show Post Titles Only On HomePage in Blogger

    0 comments
     This Tutorial will enables you to Display Posts Titles in a dwelling sheet along-with Comments Bubble on your Blog Home Page.These Titles are link with the original posts , the time One Click On Any title it brings him/her into the Specific Post.Moreover it makes your Blog Easy to navigate, so your Blog readers can easily navigate any post.Now How To Implement this Hack in Blogger, follow the below easy steps.

     How To Show Post Titles Only On HomePage in Blogger

    • Go To Blogger Dashboard
    • Click On Template
    • Then Click On Edit HTML
    • Search For </head> Tag
    • Now Copy the Below Script and paste it Before </head> tag
    <style type='text/css'>

    <b:if cond='data:blog.pageType != "static_page"'>
    <b:if cond='data:blog.pageType != "item"'>

    .post {
    margin:.5em 0 1.5em;
    border-bottom:0px dotted $bordercolor;
    padding-bottom:1.0em;
    height:50px;
    }
    .post h3 {
    margin:.25em 0 0;
    padding:0 0 4px;
    font-size:20px;
    font-family:Tahoma,Georgia,Century gothic,Arial,sans-serif;
    font-weight:normal;
    line-height:1.4em;
    color:#cc6600;
    }

    .post h3 a, .post h3 a:visited, .post h3 strong {
    display:block;
    text-decoration:none;
    color:#cc6600;
    font-weight:normal;
    }

    .post h3 strong, .post h3 a:hover {color:#333333;}

    .post-body {display:none;}
    .post-footer {display:none;}
    .comment-link {display:none;}
    .post img {display:none;}
    .post blockquote {display:none;}
    .post blockquote p {display:none;}
    h2.date-header {display:none;}
    .post-labels {display:none;}
    .post-rating {display:none;}

    </b:if>
    </b:if>

    </style>
    • Now Just Hit Save Template
    • Now Go To Layout >>  Page Elements >> Click Edit >> Enter The "Number Of Posts On Main Page".
    • Hit Save and that's it!

    Friday, 2 August 2013

    How To Expand Widget Templates in New HTML Editor

    0 comments
    After the launching of New HTML Editor , Every One is Confused What To Do? How To Use New HTML Editor ? It's Quite Simple and easy,but One Question which mostly I saw in Comments was How To Expand Widget Templates in New HTML Editor? It's Not a big Deal But Let me clear it first What is Expand Widget Template? Actually "Expand Widget Templates" was an option in Old HTML Editor.By Default Old HTML Editor only shows the core code and hides the widgets Code,By Enabling this Option You Can easily Edit any Blogger Template.All Template Core Code along-with Widgets Code will be shown when you check "Expand Widget templates" Option.

    Where Is Expand Widget Templates

    There is no Option for Expanding Widget Templates in New HTML Editor.Because All the Codes have been shown in the New Editor,that's why You Don't Need to Expand that Code any more.In New HTML Editor all widgets have been folded,A Widget Code Section which has been folded is identified by a bold fold marker i.e arrow symbol ▶,near next to the line Number.Whenever You Click on this Arrow symbol ,the concealed widget code section is revealed.
    New-Html-Editor

    How To Expand Widget In New HTML Editor

    As we mentioned above there is no option to expand the templates in New HTML Editor however the Code has been folded and we can easily reveal that code just by Clicking the arrow mentioned above.

    How To Search For A Specific Section

    It is very Simple to search for a line , tag or any word in new HTML editor.First of all Click between the Code/Script of Template>>Now Press CTRL+F >> A Box will pop-up at Top right side>> Enter the desire text , tag or any character you want to search in the template Coding.Moreover if the Tag is in folded Code,by searching it will automatically reveal from concealed widget.

    Directly Go To Widget Code

    You Can Directly jump to a widget Code in New HTML Editor.All You have to do is use Jump To Widget feature to easily and quickly locate the desired location/Code.After finding the widget Click on ▶ to expand the widget before editing.
    So What's Up: Still Confuse in Using New HTML editor? Ask Any Question Freely,we are here to help you in any Problem,Stay Blessed,Happy Blogging!

    Wednesday, 31 July 2013

    How To Make Money Online With Infolinks

    0 comments
    Infolinks is a best AdSense Substitute written text promotion system that allows you to generate money as a publisher with your Blog/Website.It can't cross AdSense in design and transaction requirements but can contend very quickly with AdSense. Actually AdSense have some tight conditions and Circumstances which every weblog writer can't follow,and consequently they may lost their AdSense Accounts,after that they think what to DO? But here is a remedy, Use Infolinks and generate a lot of cash quickly.

    How To Make Money Online With Infolinks


    • First Of All You have to sign-up in infolinks as a Publisher,Click this Link To Join 
    • Fill The Form with the Specific Data and Hit Join
    • Now a New Window will appear,there they will give you a JavaScript Code/Script
    • Copy that Code and add it in Blogger Layout ( as a Gadget in HTML/JavaScript)
    • Now Wait for 48 Hours,in these 48 Hours infolinks team review your site and approve it for your Blog/website.
    • Once Your Account is approved and You login Successfully,there you will see Infolinks Dashboard
    • In Infolinks Dashboard You Can see your Today,Yuesterday,Monthly etc earning and CPC etc.
    • Dashboard Also allows you to Customize your Ads Text Color and Styles
    Infolinks Minimum Payout: Infolinks has the smallest deal of Payout i.e $50 for their Publishers,Once You Start earning via Infolinks,and Your Earning threshold reached to 50$ You Can order for with drawl.Infolinks will pay money via Paypal,Wiretransfer and  Payoneer Card.


    Tuesday, 30 July 2013

    Cool Advertise Here Text with Hover Effect

    0 comments
    Cool Advertise Here Text with Hover Effect: Keeping Affiliate and Link Selling in view the Ad which will be placed on your site should be an attractive One.Visitors really like creativity and awesomeness of any thing in Your Web Log,it is a common problem these days that every Blogger who Place ads in his/her blog is really a dull One.In This regards,we gonna help you to add a significant Style Advertise Banner which will surely help you to get some bounty from visitors and you will get alot of chances to get advertisement from different Companies.


    Cool Advertise Here Text with Hover Effect


    How To Add Cool Advertise Here Text with Hover Effect

    • Go To Blogger Dashboard.
    • Click On Layout
    • Click On Add a Widget at the Right Side-bar
    • A Box will Pops-up
    • Select HTML/JavaScript
    • Copy the Below Script and paste it over there
    <style>#text{-moz-transform:rotate(-5deg);-o-transform:rotate(-5deg);-webkit-transform:rotate(-5deg);color:#FFF!important;font-family:arial;font-size:60px;font-weight:300;letter-spacing:-5.5px;line-height:45px;text-align:center;margin:20px 10px}#text a{color:#333;text-shadow:1px 1px #000, 3px 3px #EEEEEE, 5px 5px #DDDDDD, 7px 7px #AAAAAA, -1px -1px #000;text-transform:lowercase;-moz-transition:all .3s ease-in 0;-webkit-transition:all .3s ease-in 0;-o-transition:all .3s ease-in 0;-kmoz-transition:all .3s ease-in 0}#text a:hover{-moz-transition:all .3s ease-in 0;-webkit-transition:all .3s ease-in 0;-o-transition:all .3s ease-in 0;-kmoz-transition:all .3s ease-in 0;text-shadow:1px 1px #000, 3px 3px #EEEEEE, 5px 5px #DDDDDD, 7px 100px transparent, -1px -100px transparent;color:transparent}inf{color:#d2a}#text a:focus,#text a:active{color:#eee!important;-moz-transition:all 0 ease-in-out!important;-o-transition:all 0 ease-in-out!important;-kmoz-transition:all 0 ease-in-out!important;-webkit-transition:all 0 ease-in-out!important}</style><div id="text" class="rent"><a href="URL" target="blank"><blink>&#8669;</blink> Here is a free space.<br />Contact <inf>α&#8574;мїη for more information</inf><blink>&#8668;</blink></a></div>
    Note: Change "URL" to the link of the Page where you want to redirect the visitors when they click the ad.Now Just hit Save and that's it ! Ask any Question freely ;) We are here to Solve Your Problems,Happy Blogging!
    Cool Advertise Here Text with Hover Effect
    Last Reviewed by Iftikhar on July 31 2013
    Rating: 4.5

    Tuesday, 23 July 2013

    How To Link Google AdSense And Google Analytics Accounts

    0 comments
    It is necessary for you to incorporate Search engines AdSense Consideration with your Search engines Statistics.The Reward Factor is that you can quickly monitor the ad performance(i.e CPM,CTR,etc) of every web page of your Weblog without developing AdSense Programs.You Can See all details About your Blog/Website at Search engines Statistics.


    How To Link Google AdSense And Google Analytics Accounts

    • Go To Your Google Analytics Account and Login there(if you don't have any account create it)
    • Once You enter into Google Analytics Dashboard >> Click On Admin Tab as shown

    • Now There Click On The Site(URL) which You want to link with AdSense Account.
    • Another Window will Pops-up >> Click On User Tab
    • Now Click On New User Tab


    • Now After these Steps add your AdSense E-mail Address which you want to Link with Google Analytics >> Give Administrator Permission to the entered e-mail.
    • Now Logout from Google Analytics Account and Sign in to AdSense Account >> Click On Account Settings Tab
    • Now Go To Access and Authorization Tab >> There Click Google analytic integration tab and Edit(Accounts Link).


    • Now for linking Account Just Click On Link and for Unlinking Click Unlink Option !


    • That's it ! Happy Blogging!

    So What's Up : By Linking Google AdSense and Google Analytics Accounts You will get some extra information's about Your AdSense Earning and improvement or dropping in Earning.However for the best analysis I recommend "Linking Of Adsense Account with Google Analytics".

    How To Link Google AdSense And Google Analytics Accounts
    Last Reviewed by IfTiKhar! on July 23 2013
    Rating: 4.5

    Monday, 15 July 2013

    How To Setup Custom Robots Header Tags in Blogger For Better SEO

    0 comments
    Blogger consistently delights the Blog writers with new awesome features.Custom Robots Headlines Labels/Tags enables you to tell the web crawlers and spiders to not catalog certain area of Your Blog/site.For the best of SEO,You should manually setup Custom Robots Header Tags.When we talks about SEO,its not a factor that You apply it and Your Weblog will start getting unique visitors.It needs time,The main factor which SEO need is Time,so be Patience and wait for lovely fruits and veggies.
    enable Custom robots header tags in blogger

    How To Setup Custom Robots Header Tags in Blogger For Better SEO


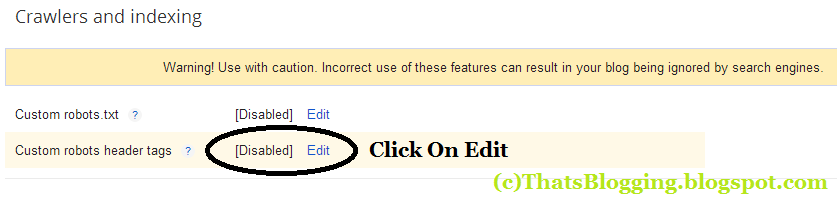
    • There You will see the Option Of “Custom robots header tags”
    • Click On Edit (as shown Below)
    • By Clicking Edit New Option will appear >> There Select Yes !
    • Now in the Next menu Select all The Options as Shown in the Below Screenshot.
    • And Now Just Hit save Changes , That's it!

    Note: Don't add any thing wrong in this menu,it will effect your Blog Rank.Just Follow the above Steps and wait for the result.As I mentioned Above SEO is not a thing that you implement it today,and automatically your Blog will start getting traffic,but it takes time.So Always be patience and see the result.Happy Blogging!


    How To Setup Custom Robots Header Tags in Blogger For Better SEO
    Last Reviewed by The Gamer on July 16 2013
    Rating: 3.5


    Saturday, 29 June 2013

    How To Add Each Blog Post in Separate box

    0 comments
    Add Each Blog Post in Separate box:-In many Blogger Templates you may have seen that there is not a separate box for every Post,but each post is completely shown as in Dynamic Blogger Templates.Here we will show you How to Add Each Post in a Separate Beautiful Box along-with many Color Schemes.Actually this hack can be applied by using CSS ,Applying this hack each post will be shown in a separate box and when ones hover mouse it will change the Border Color and When Again Hover it will automatically again change the Color.Now How to do it,Let me Elaborate it in some easy steps.
    How To Add Each Blog Post in Separate box

    How To Add Each Blog Post in Separate box

    • Go To Blogger.com
    • Sign in There and Go To Blogger Dashboard
    • There Click on Template
    • Then Click On Customize
    • After that Click On Advanced Option
    • And Then Select CSS(i.e Add CSS)
    • Now Copy the below Code and paste it over there.
    .post {
    background:#FFFFFF;
    border: 2px solid #000000;
    padding-right:7px;
    padding-left:7px;
    }
    .post:hover {
    border: 2px solid #FF0000;
    }
    .post:active {
    border: 2px solid #0004FF;
    }
    • That's it
    Customization :- If You are interested in Changing the background Color then Replace #FFFFFF with Your Own Color Code.And If you want to change the Border Color then Change #000000 #FF0000 #0004FF  to Your Desired Color Code

    How To Add Each Blog Post In Separate box
    Last Reviewed by The Gameron October 29 2013
    Rating: 4.5

    Friday, 14 June 2013

    Easy Way To Create Sitemap For Blogger

    0 comments
    Sitemap is a list of pages Of a Blog or Website which enables the Search Engine Crawlers to crawl the blog/website pages.Actually there are two types of Sitemap.

    1. XML Sitemap
    2. HTML Sitemap
    XML Sitemap is actually a structured format which a user can't see i.e it may be in the coding of Template or hidden. But the bonus point of this Sitemap is they tell the search Engines for crawling the web pages while on the other side HTML Site-Map are specially designed for the users to enable them to find content on your Blog/website,this visitors and Search Engine Bots find the pages of such Site-mapped blog.
    sitemap

    How To Create Sitemap For Blogger

    • All you have to do is making a new page in your Blog
    • After Creating a Page Click On The Pages
    • And Then Click On The Page you have Created
    • Now There will be two Option at the left-most side i.e Compose/HTML
    • Simply Click On HTML
    • Now Copy the Below Script and paste it there
    <div dir="ltr" style="text-align: left;" trbidi="on">
    <script src="http://yourjavascript.com/18113981113/bukarahasiablog-toc.js"></script><script src="http://thatsblogging.blogspot.com/feeds/posts/default?max-results=9999&amp;alt=json-in-script&amp;callback=loadtoc"></script>
    </div>

    • Change "http://thatsblogging.blogspot.com" with your Blog Name!
    • Now Save The Pages Section
    • And That's it.
    So What's Up:- Adding Sitemap to Blog which certainly enable the Search Engine Crawlers to crawl  your Blog Contents as a result you may get high rank and traffic,Share your beautiful ideas with us,Stay Blessed,Happy Bloggging!
    Easy Way To Create Sitemap For Blogger
    Last Reviewed by Iftikhar on June 15 2013
    Rating: 5

    Wednesday, 5 June 2013

    Add Divider(line) Between Posts in Blogger

    0 comments
    Another interesting Hack for Blogger is How To Add Divider Between The Blogger Posts?Adding Divider between the posts is nothing else it will just add an image which will clarify the posts i.e One can easily navigate any post.Actually by default Blogger template has a Line which divides the post but isn't that Looking Bore? Of Course its Boring then don't waste your time,this is the time to make your Blog Creative and Attractive.

    First Of all you have to find a Picture which you want to use as a divider e.g in Our Case we have the below image which we will use to add divider b/w the Posts.
    You can host your Divider image in any hosting such as tinpic or Photo Bucket etc.

    How To Add Divider(line) Between Posts in Blogger

    • Go To Blogger Dashboard >> Template >> Edit HTML
    • Search for this Code
    .post { margin:.5em 0 1.5em; border-bottom:1px dotted $bordercolor; padding-bottom:1.5em; }

    • Now Replace the Above Code with The Below Script and if you are interested in Changing the divider image just change the URL and Do This Step

    .post {
    background: url(http://i36.tinypic.com/xqid55.jpg);
    background-repeat: no-repeat;
    background-position: bottom center;
    margin:.5em 0 1.5em;
    border-bottom:0px dotted $bordercolor;
    padding-bottom:3.6em;
    }

    •  Replace the Red URL mentioned with your Own Divider image url
    • If you want to Change "Padding-Bottom" increase or decrease the value in Black Bold Script

    2nd Method For Adding Divider Between Posts in Blogger

    If The Above Method is not working in your Template,then you have to use this method which is very easy !
    • Go To Blogger Dashboard
    • Click on Template
    • Edit HTML
    • Now Search for the below Script
    <div class='post-footer-line post-footer-line-3'/>

    • Now Copy the below Script and Add it below the above Script
    <center><img height='30' src='divider image url'/></center> 
    Tip:- If you want to increase the Divider height Change 30 to the Desired value,and Add Divider image url in the script and that's it!

    So What's Up:- This was an awesome trick,it is ideal for bloggers to add this divider image between the posts.It will help their visitors to easily navigate the blogging contents.Share your ideas with us , stay Blessed Happy Blogging!

    Advertisement


    Copyright 2008 All Rights Reserved Revolution Two Church theme by Brian Gardner Converted into Blogger Template by Bloganol dot com